In the article Improve Test Quality with Mutation Testing, we explored what mutation testing is, what it's for, and how it works using a simple Fizz Buzz kata.
We also determined that mutation tests act as “watchdogs” that validate whether our tests are doing their job properly.
Mutation testing is often dismissed in real-world projects due to its slowness. In this post, we’ll see how to implement it efficiently in a Spring Boot 3 project.
Before diving in, let's go over the rules for effective implementation of mutation testing. For Mutation Testing to be viable, our tests must meet the following requirements:
- Produce the same result on each execution.
- Be very fast.
- Execute in any order.
- Run in parallel.
Basically, unit tests meet these requirements, so we should exclude the following types of tests from mutation testing:
- Integration and E2E tests.
- Performance tests.
- Contract tests.
- Any test that changes global state.
With that in mind, let’s get started! We'll now see how to apply it in a Spring Boot 3 project more effectively.
We'll use Pitest, a cutting-edge mutation testing system that provides industry-standard test coverage for Java and the JVM. It’s fast, scalable, and integrates with modern testing and build tools.
Why choose Pitest?
There are other mutation testing tools for Java, but they are not widely adopted. Most of them are slow, hard to use, and designed more for academic research than for real development teams.
Pitest stands out for several reasons:
- Fast: can analyze in minutes what older systems would take days to do.
- Easy to use: works with Ant, Maven, Gradle, and others.
- Actively maintained and supported.
We’ll add Pitest to an existing project. You can find the code on this GitHub repository: spring-boot-3-mutation-testing.
Add the Pitest Plugin to the Project
Let’s add the Pitest plugin to our pom.xml:
<plugin>
 <groupId>org.pitest</groupId>
 <artifactId>pitest-maven</artifactId>
 <version>1.7.6</version>
 <dependencies>
   <dependency>
     <groupId>org.pitest</groupId>
     <artifactId>pitest-junit5-plugin</artifactId>
     <version>0.16</version>
   </dependency>
 </dependencies>
</plugin>
I'm using Maven in this example, but if you prefer to use it with Gradle, you can follow this tutorial: Gradle quick start.
Review the Results
Let’s test if everything works by running the following commands:
mvn clean test
mvn pitest:mutationCoverage
Both commands must be run in order, because Pitest works with compiled code. If the code and tests are not compiled, you won't see the results of your latest changes.
If you haven’t made any changes, running the second command is enough. A quicker alternative command could be:
mvn clean compile test-compile
mvn pitest:mutationCoverage
Personally, I like fast feedback, so I prefer to run the tests first and then mutationCoverage.
After waiting a bit, we see the result:

It failed. As we saw in the previous article, Pitest runs all tests before starting the mutations, and the failing test is an integration one using Testcontainers, which is slow.
This doesn't meet the requirements. Let's exclude them from mutation testing.
Exclude integration tests
We configure Pitest to exclude integration tests by modifying our pom.xml as follows:
<plugin>
 <groupId>org.pitest</groupId>
 <artifactId>pitest-maven</artifactId>
 <version>1.7.6</version>
 <dependencies>
   <dependency>
     <groupId>org.pitest</groupId>
     <artifactId>pitest-junit5-plugin</artifactId>
     <version>0.16</version>
   </dependency>
 </dependencies>
 <configuration>
   <excludedTestClasses>
     <param>**.*IntegrationTest</param>
   </excludedTestClasses>
 </configuration>
</plugin>
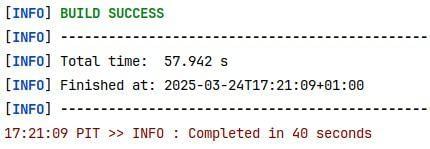
We run the Maven commands again and this time it completes successfully:
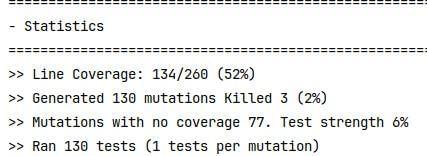
We review the statistics provided by Pitest and see that 2% of mutations were killed, the rest survived:
At the end of the mutation test execution, Pitest creates a pit-reports folder with the execution results inside /target.
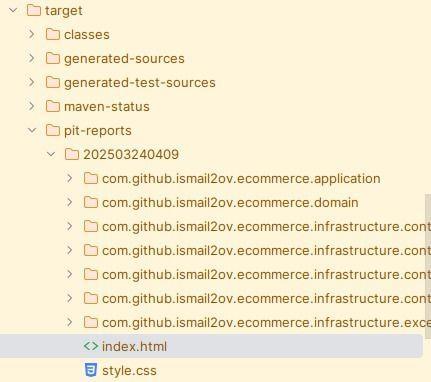
We open the index.html to view the result in a clearer and more understandable way:
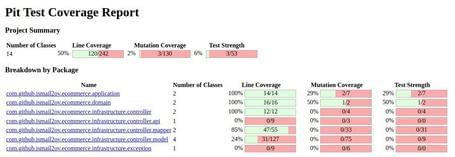
After reviewing the results, we see that most of the classes without Mutation Coverage are autogenerated:
| Class name | Generated by |
|---|---|
| *RDTO | OpenAPI codegen |
| *MapperImpl | MapStruct |
| ApiUtil | OpenAPI codegen |
They are noisy mutants, so let's exclude them.
Exclude Noisy Mutants
Once again, we modify our pom.xml to exclude the autogenerated classes:
<plugin>
 <groupId>org.pitest</groupId>
 <artifactId>pitest-maven</artifactId>
 <version>1.7.6</version>
 <dependencies>
   <dependency>
     <groupId>org.pitest</groupId>
     <artifactId>pitest-junit5-plugin</artifactId>
     <version>0.16</version>
   </dependency>
 </dependencies>
 <configuration>
   <excludedClasses>
     <param>**.*Application</param>
     <param>**.*RDTO</param>
     <param>**.*MapperImpl</param>
     <param>**.controller.api.ApiUtil</param>
   </excludedClasses>
   <excludedTestClasses>
     <param>**.*IntegrationTest</param>
   </excludedTestClasses>
 </configuration>
</plugin>
We run the mutation tests again and see that the mutation time has decreased and the mutation kill percentage has increased to 16%. Not bad — this means we’re on the right track.
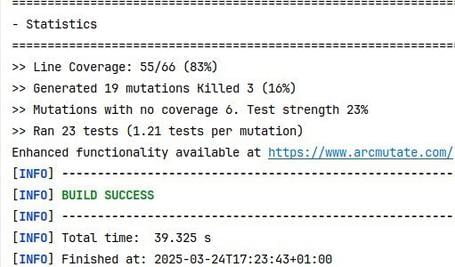
Now we’re left with mutants that can’t be killed and/or carry useful information.
How to optimize Pitest?
One of the things we can do is optimize Pitest. To do this, we configure it with the following optimizations:
- Disable timestamped reports: by default, Pitest generates a report folder with the date and time of execution. To avoid this, just set timestampedReports to false.
- Increase the execution threads: setting the number of threads to 8, for example, significantly improves performance.
- Enable analysis history: this helps speed up local runs by reusing previous mutation data.
- Set a mutation threshold: define a minimum mutation coverage percentage. For instance, 80% ensures that if the threshold is not met, it raises an error — helping maintain code quality.
We apply these improvements in our pom.xml:
<plugin>
 <groupId>org.pitest</groupId>
 <artifactId>pitest-maven</artifactId>
 <version>1.7.6</version>
 <dependencies>
   <dependency>
     <groupId>org.pitest</groupId>
     <artifactId>pitest-junit5-plugin</artifactId>
     <version>0.16</version>
   </dependency>
 </dependencies>
 <configuration>
   <timestampedReports>false</timestampedReports>
   <threads>8</threads>
   <withHistory>true</withHistory>
   <mutationThreshold>80</mutationThreshold>
   <excludedClasses>
     <param>**.*Application</param>
     <param>**.*RDTO</param>
     <param>**.*MapperImpl</param>
     <param>**.controller.api.ApiUtil</param>
   </excludedClasses>
   <excludedTestClasses>
     <param>**.*IntegrationTest</param>
   </excludedTestClasses>
 </configuration>
</plugin>
We run the mutationCoverage and see that it takes less time, but the result is a failure, because we’re below the threshold we defined:

Thanks to enabling the analysis history, if we run the mutation tests again, it will take significantly less time.
Killing the mutants
Now that everything is properly configured, we can start killing the mutants. To do this, we’ll analyze the results of the mutation tests.
Let’s check what’s wrong with BasketController. Pitest replaced the return values of the controller methods with null, and the mutants survived.
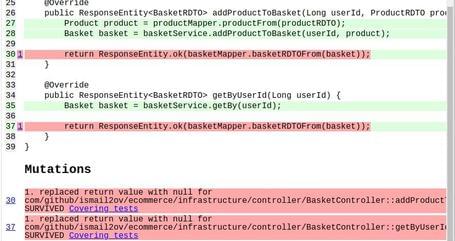
Looking at the test, we can see it only verifies the status code without checking the actual response.
Let’s fix that:
@Test
void return_basket_without_items() throws Exception {

   Basket basket = new Basket(1L, 1L, new Items());

   when(basketService.getBy(1L)).thenReturn(basket);

   this.mockMvc
       .perform(get("/users/1/basket"))
       .andExpect(status().isOk())
       .andExpect(jsonPath("$.id").value(1))
       .andExpect(jsonPath("$.userId").value(1))
       .andExpect(jsonPath("$.items.products.size()").value(0));
}
- We add assertions for the response body in both tests.
- We also fix the tests in ProductController.
- We review the report.
Now, mutationCoverage gives us 37% and all mutants in the .infrastructure.controller package have been caught — not bad!

We continue improving the assertions in the tests under the application and domain packages.
Now, we just need to add test coverage for the GlobalExceptionHandler class, as it’s the only one left with 6 surviving mutants.
Let’s start by adding a new test in ProductControllerTest:
@ExtendWith(SpringExtension.class)
@WebMvcTest
@ContextConfiguration(classes = {ProductController.class, GlobalExceptionHandler.class})
@Import(ProductMapperImpl.class)
class ProductControllerTest {

   @Test
   void return_basket_not_found() throws Exception {
       doThrow(ProductNotFoundException.class).when(productService).getProductBy(100L);

       this.mockMvc
           .perform(get("/products/100"))
           .andExpect(status().isNotFound())
           .andExpect(content().contentType(MediaType.APPLICATION_PROBLEM_JSON))
           .andExpect(jsonPath("$.title").value("Out of Stock"))
           .andExpect(jsonPath("$.detail").value("Something went wrong!"))
           .andExpect(jsonPath("$.type").value("https://example.org/out-of-stock"));
   }

}
We do the same for the case where the cart does not exist. We run the mutation tests and voilà! 19 mutants were created and all of them were killed. Everything is green!

We've seen how we can improve the quality of our tests using Mutation Testing.
Speeding up Mutation Tests
In large projects, mutation tests can take a long time and are difficult to integrate into pipelines.
For example, Pitest generates 43,619 mutants for the Apache Flink core, and the mutation tests take 2:29:45 hours. No one wants to wait two and a half hours for a pipeline step to complete.
There's a collaborative research project called STAMP (Software Testing Amplification for DevOps), from which Descartes was born. It's a mutation engine for Pitest.
Extreme Mutation Testing
In extreme mutation testing, all the logic in the method being tested is removed.
All statements are stripped from a void method. In other cases, the body is replaced with a single return statement. This approach produces significantly fewer mutants.
How Descartes works
Descartes aims to bring an effective implementation of this mutation operator to Pitest and to evaluate its performance in real-world projects.
If we compare the performance of Descartes vs. Gregor (the default Pitest engine), we see that for Apache Flink's core, Descartes creates 4,935 mutants and the tests take just 14:04 minutes. That's impressive!
Using Descartes as the mutation engine
We modify the Pitest plugin configuration in our pom.xml to change the mutation engine to Descartes:
<plugin>
 <groupId>org.pitest</groupId>
 <artifactId>pitest-maven</artifactId>
 <version>1.7.6</version>
 <dependencies>
   <dependency>
     <groupId>org.pitest</groupId>
     <artifactId>pitest-junit5-plugin</artifactId>
     <version>0.16</version>
   </dependency>
   <dependency>
     <groupId>eu.stamp-project</groupId>
     <artifactId>descartes</artifactId>
     <version>1.3.2</version>
   </dependency>
 </dependencies>
 <configuration>
   <mutationEngine>descartes</mutationEngine>
   <timestampedReports>false</timestampedReports>
   <threads>8</threads>
   <withHistory>true</withHistory>
   <mutationThreshold>80</mutationThreshold>
   <excludedClasses>
     <param>**.*Application</param>
     <param>**.*RDTO</param>
     <param>**.*MapperImpl</param>
     <param>**.controller.api.ApiUtil</param>
   </excludedClasses>
   <excludedTestClasses>
     <param>**.*IntegrationTest</param>
   </excludedTestClasses>
 </configuration>
</plugin>
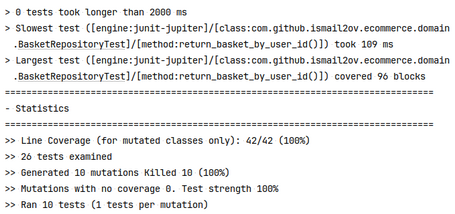
We run the mutation tests and observe that this time, 10 mutants were generated instead of 19, and all of them were successfully killed.
It’s important to remember that each mutant triggers the execution of all tests, so reducing the number of mutants also reduces execution time.

Updating Pitest and Descartes
The Descartes mutation engine works very well, but it hadn't released a new version in four years and was not compatible with the latest versions of Pitest… until last month. I made some improvements to ensure compatibility with the newest Pitest version, and we finally have a new release: Descartes 1.3.3.
Let’s update the versions of Pitest and Descartes to the latest ones available:
- pitest-maven: 1.20.2
- pitest-junit5-plugin: 1.2.3
- descartes: 1.3.3
Here’s how the changes in our pom.xml would look:
<plugin>
 <groupId>org.pitest</groupId>
 <artifactId>pitest-maven</artifactId>
 <version>1.20.2</version>
 <dependencies>
   <dependency>
     <groupId>org.pitest</groupId>
     <artifactId>pitest-junit5-plugin</artifactId>
     <version>1.2.3</version>
   </dependency>
   <dependency>
     <groupId>eu.stamp-project</groupId>
     <artifactId>descartes</artifactId>
     <version>1.3.3</version>
   </dependency>
 </dependencies>
 <configuration>
   <mutationEngine>descartes</mutationEngine>
   <timestampedReports>false</timestampedReports>
   <threads>8</threads>
   <withHistory>true</withHistory>
   <mutationThreshold>80</mutationThreshold>
   <excludedClasses>
     <param>**.*Application</param>
     <param>**.*RDTO</param>
     <param>**.*MapperImpl</param>
     <param>**.controller.api.ApiUtil</param>
   </excludedClasses>
   <excludedTestClasses>
     <param>**.*IntegrationTest</param>
   </excludedTestClasses>
 </configuration>
</plugin>
We run the mutation tests again and see that nothing has changed — 10 mutants were generated and all were successfully killed.
This version of Pitest provides more insights, such as:
- Slow tests: no test took more than 2 seconds (timeout threshold)
- Slowest test: return_basket_by_user_id() with 109 ms.
- Widest test: return_basket_by_user_id() covered 96 code blocks.
Conclusions
Effectively implementing Mutation Testing in Spring Boot 3 projects allows us to significantly improve the quality of our unit tests and code robustness.
Throughout this post, we've seen how to configure and optimize Pitest to get accurate results while reducing execution time.
Key takeaways:
- Mutation Testing strengthens your tests: it helps identify weak test cases and improves bug detection in your code.
- Focus on unit tests: for best results, exclude integration, performance, and state-dependent tests.
- Optimization is essential: tuning thread count, enabling history, and excluding noisy mutants speed up execution without sacrificing effectiveness.
- Set a quality threshold: defining a minimum mutation percentage ensures code meets high standards before being approved.
Ultimately, Mutation Testing not only validates the quality of your tests but also helps you write better unit tests.
You can check all the step-by-step commits and code in the GitHub repository: spring-boot-3-mutation-testing-project.
Useful links
- PITest
- Descartes Mutation Engine
- Test Coverage
- An example of effective mutation testing in Spring Boot 3 projects with:
Comments are moderated and will only be visible if they add to the discussion in a constructive way. If you disagree with a point, please, be polite.


Tell us what you think.