We continue our series on microservices architecture patterns, and this time we’ll focus on security. If you missed any of the previous posts in this series, we encourage you to check them out 😉:
- Microservices Architecture Patterns: What Are They and What Benefits Do They Offer?
- Architecture Patterns: Organization and Structure of Microservices.
- Architecture Patterns: Microservices Communication and Coordination.
- Microservices Architecture Patterns: SAGA, API Gateway, and Service Discovery.
- Microservices Architecture Patterns: Event Sourcing and Event-Driven Architecture (EDA).
- Microservices Architecture Patterns: Communication and Coordination with CQRS, BFF, and Outbox.
- Microservices Patterns: Scalability and Resource Management with Auto Scaling.
- Architecture Patterns: From Monolith to Microservices.
- Externalized Configuration.
- Architecture Patterns in Microservices: Consumer-Driven Contract Testing
General Introduction to Security in Microservices
In a microservices environment, the functionality of a large application is broken down into multiple independent services, each with specific responsibilities.
We continue with the common thread of all our previous posts, using the example of an e-commerce, where we could have:
- Catalog Service: handling products, categories, inventories, among others.
- Cart Service: adding and removing products from the cart, calculating partial costs, applying coupons, etc.
- Order Service: processing order creation, sending confirmations, communicating with the payment gateway, etc.
- Auth Service: managing users, tokens, and permissions.
Each of these services will communicate with others (or with a gateway) to complete business flows. However, when building a distributed system, the challenge arises of how to ensure that each request comes from a legitimate client and that the operations to be performed are properly authorized.
Traditionally, in monolithic systems, security was usually handled through:
- Server sessions (session cookies).
- A centralized mechanism that validated users and roles.
In microservices, this becomes more complex because:
- The application is stateless, or aims to be, to support scalability.
- Each service must verify the legitimacy of the call, preferably without constantly contacting a central service, as this could introduce latency or a single point of failure.
- We need to manage both authentication (who the user is) and authorization (what the user can do).
Importance of Data
Security is critical in any application, especially if (using the e-commerce example):
- It handles personal data (name, address, email).
- It processes payment transactions.
- It stores payment methods (credit cards, PayPal accounts, etc.).
- There is sensitive data that could expose the business to fraud and regulatory compliance issues (e.g., PCI DSS for card payments).
Therefore, ensuring that communications are properly authenticated and that each user only accesses their own resources is essential.
Security Patterns in Microservices
In this article, we will focus on three patterns commonly used in practice:
- Token-based Authentication
- OAuth (Open Authorization)
- JWT (JSON Web Tokens)
While there are other approaches (SAML, Basic Auth over TLS, Kerberos, etc.), these three have become particularly popular in modern microservices and REST API architectures.
Note. As you’ll see, we will split these patterns into two parts. In the first, we’ll look at Token-based Authentication and OAuth, and in the second, JWT and a few more interesting comparisons.
Note 2. The code examples are only intended to illustrate the concepts. Some parts may be incomplete or contain demo snippets that wouldn’t apply in real environments.
1 Token-Based Authentication
General Description
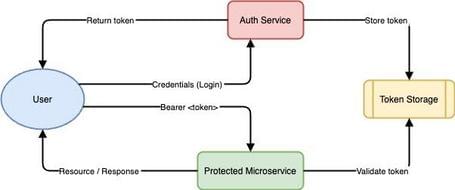
In token-based authentication, a client (e.g., a JavaScript web app, a mobile app, etc.) sends credentials (username, password) to an authentication service. After validating the credentials, this service issues a token (typically a unique string, like a UUID or hash). This token is then used for all subsequent requests: the client usually includes it in the Authorization header (typically Bearer
Advantages:
- No traditional user sessions are stored on the server.
- The system can be stateless if we use ephemeral tokens or if validation is done in a very fast central repository (like Redis).
- Works well with SPA (Single Page Applications) or mobile clients, which can securely store the token (with appropriate precautions).
Disadvantages:
- Requires a token store (if we want to revoke tokens or invalidate them before expiration).
- Expiration handling and secure client-side token storage must be carefully managed.
- Possible performance hit if every service constantly queries a central repository to validate tokens.
E-commerce Scenario
Let's suppose we have:
- Auth Service: issues tokens and validates credentials.
- Cart Service and Order Service: need to confirm that the user performing the operation is authenticated.
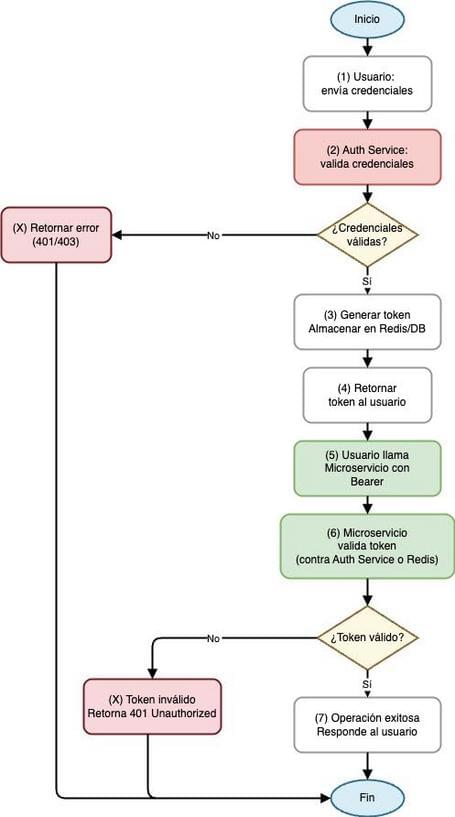
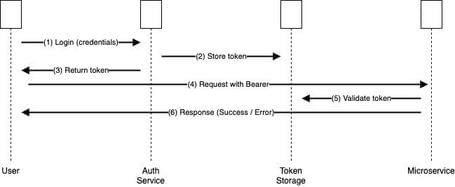
The flow would look like this:
- Login: The client sends username and password to the Auth Service via a POST /auth/login endpoint.
- Token Generation
- The Auth Service validates the credentials and generates a unique token, associates it internally with the user, and stores it in a system like Redis (key:
, value: user data and expiration date). - Returns the token to the client.
- Token Use
- The client invokes, for example, the Cart Service on POST /cart/items with the header Authorization: Bearer
. - The Cart Service, upon receiving the request, either contacts the Auth Service or directly checks the token repository (Redis) to see if the token is valid.
- If the token exists and is valid, it allows the operation; otherwise, it blocks it.
The flow diagram would look like this:
The sequence diagram:
Detailed Implementation in Spring Boot
Let’s look at an example of how to configure this authentication in a Java project using Spring Boot.
- Recommended dependencies
In your pom.xml (assuming Maven), you might include:
<dependencies>

    <!-- For basic security in Spring -->
    <dependency>
        <groupId>org.springframework.boot</groupId>
        <artifactId>spring-boot-starter-security</artifactId>
    </dependency>

    <!-- To manage data in Redis, if we use Redis for tokens -->
    <dependency>
        <groupId>org.springframework.boot</groupId>
        <artifactId>spring-boot-starter-data-redis</artifactId>
    </dependency>

    <!-- Other dependencies needed for your e-commerce -->
    <!-- ... -->
</dependencies>
- Redis Configuration (optional but common)
If we choose to store tokens in Redis, we configure it in application.yml:
spring:
  redis:
    host: localhost
    port: 6379
- Token Management Service Class
This service centralizes the logic for:
- Generating tokens (e.g., using UUID.randomUUID().toString()).
- Storing and validating tokens in a repository (which can be Redis, a SQL database, an in-memory store, etc.).
- Retrieving user information associated with each token (e.g., username, roles).
@Service
public class TokenService {

    @Autowired
    private RedisTemplate<String, Object> redisTemplate;

    // Token expiration duration in seconds, e.g., 2 hours
    private final long TOKEN_EXPIRATION_SEC = 7200;

    public String generateTokenForUser(String username) {
        String token = UUID.randomUUID().toString();

        // Store in Redis with expiration
        // We could store an object with roles, name, email, etc.
        redisTemplate.opsForValue().set(token, username, TOKEN_EXPIRATION_SEC, TimeUnit.SECONDS);
        return token;
    }

    public boolean isValidToken(String token) {
        String username = (String) redisTemplate.opsForValue().get(token);
        return username != null; // Token exists and has not expired
    }

    public String getUsernameFromToken(String token) {
        return (String) redisTemplate.opsForValue().get(token);
    }

    public void revokeToken(String token) {
        // Manually delete token from Redis if you want to revoke it
        redisTemplate.delete(token);
    }

    public void revokeAllTokensForUser(String username) {
        Set<String> keys = redisTemplate.keys("*"); // Search all keys
        if (keys != null) {
            for (String key : keys) {
                String storedUsername = (String) redisTemplate.opsForValue().get(key);
                if (username.equals(storedUsername)) {
                    redisTemplate.delete(key); // Delete the user's tokens
                }
            }
        }
    }
}
Here, each token is associated with a username, but in a real e-commerce system we would include more details (roles, user ID, etc.). Every time we generate a token, we use a UUID and store it in Redis with a defined expiration time.
- Authentication Filter (TokenAuthenticationFilter)
The filter is responsible for intercepting each HTTP request, extracting the token (if present), and validating its legitimacy. Only if the token is valid, the user is marked as authenticated in the Spring Security context.
@Component
public class TokenAuthenticationFilter extends OncePerRequestFilter {

    @Autowired
    private TokenService tokenService;

    @Override
    protected void doFilterInternal(HttpServletRequest request,
                                    HttpServletResponse response,
                                    FilterChain filterChain)
                                    throws ServletException, IOException {
        String authHeader = request.getHeader("Authorization");
        String token = null;

        if (authHeader != null && authHeader.startsWith("Bearer ")) {
            token = authHeader.substring(7);
        }

        if (token != null && tokenService.isValidToken(token)) {
            String username = tokenService.getUsernameFromToken(token);

            // Additional user info could be loaded here to assign roles
            UserDetails userDetails = new User(username, "",
                    Collections.singletonList(new SimpleGrantedAuthority("ROLE_USER")));

            // Spring Security requires an Authentication object to "log in" the user
            UsernamePasswordAuthenticationToken authentication =
                    new UsernamePasswordAuthenticationToken(userDetails, null, userDetails.getAuthorities());

            // Set it in Spring Security's context
            SecurityContextHolder.getContext().setAuthentication(authentication);
        }

        // Continue with the filter chain
        filterChain.doFilter(request, response);
    }
}
- Security Configuration
The SecurityConfig class uses the Spring Security infrastructure to define:
- Which routes are public (for example, the login endpoint).
- Which routes require authentication.
- Where in the filter chain the authentication filter is applied.
@Configuration
@EnableWebSecurity
public class SecurityConfig {

    @Bean
    public SecurityFilterChain securityFilterChain(HttpSecurity http,
    TokenAuthenticationFilter tokenAuthenticationFilter) throws Exception {
        return http
            .csrf(csrf -> csrf.ignoringRequestMatchers("/auth/login")) // Best practice
            .authorizeHttpRequests(auth -> auth
                .requestMatchers("/auth/login", "/public/**").permitAll() // Public section
                .anyRequest().authenticated()
            )
            .addFilterBefore(tokenAuthenticationFilter,
                UsernamePasswordAuthenticationFilter.class)
            .build();
    }
}
- Authentication Controller
We could create a controller to handle the login:
@RestController
@RequestMapping("/auth")
public class AuthController {

    @Autowired
    private TokenService tokenService;

    @PostMapping("/login")
    public ResponseEntity<?> login(@RequestBody LoginRequest loginRequest) {
        // Validate credentials: this could involve querying a database
        // We'll assume a user "demo" with the password "password" for this example.

        if ("demo".equals(loginRequest.getUsername())
                && "password".equals(loginRequest.getPassword())) {
            String token = tokenService.generateTokenForUser(loginRequest.getUsername());
            return ResponseEntity.ok(Collections.singletonMap("token", token));
        } else {
            return ResponseEntity.status(HttpStatus.UNAUTHORIZED)
                                 .body("Invalid credentials");
        }
    }
}

class LoginRequest {
    private String username;
    private String password;
    // Getters and Setters
}
- Process Flow
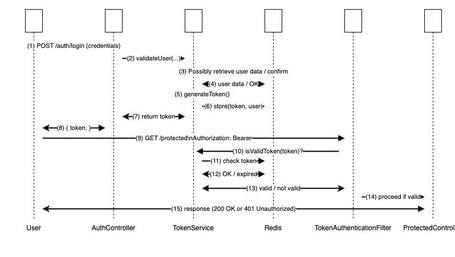
The diagram illustrates two main phases of token-based authentication:
Phase 1: Login Flow
- The user sends their credentials to the POST /auth/login route.
- The AuthController processes the request and calls a validation method in the TokenService (either internally or via a UserService to check the password).
- The TokenService may query Redis (or a database) to validate the user’s status or fetch additional data (optional).
- Redis responds with the necessary information (e.g., user found).
- The TokenService generates the token (e.g., using UUID.randomUUID()).
- The TokenService stores the token → userId mapping in Redis with an expiration.
- The TokenService returns the token to the AuthController.
- The AuthController sends the JSON response to the User with the token ({"token":"
"}).
Phase 2: Request to a Protected Resource
- The user makes a GET request to /protected (or any secured endpoint), including the Authorization header: Bearer
. - Before reaching the actual controller, the request is intercepted by the TokenAuthenticationFilter (configured in SecurityConfig).
- The filter calls TokenService to verify if the token is still valid.
- The TokenService checks Redis for the existence and/or expiration of the token.
- Redis responds confirming if the token is valid or has expired / doesn’t exist.
- The TokenService informs the filter of the result (valid or not).
- If valid, the filter passes execution to the ProtectedController. If not, it returns a 401 error.
- The ProtectedController handles the request and finally responds to the user. The response may be 200 OK if successful, or 401 Unauthorized if the token was invalid.
Conclusion on Token-Based Authentication
This pattern is fairly straightforward and easier to implement than others, but it requires careful management of token storage and revocation. If your e-commerce system needs to revoke tokens quickly (e.g., for blocked accounts), you’ll need either a central approach or a broadcast mechanism to invalidate tokens across all nodes.
OAuth (Open Authorization)
General Overview
OAuth is an authorization protocol that allows users to share protected resources with third-party apps without exposing their credentials. OAuth 2.0 introduced several flows (grants), one of the most common being the Authorization Code Grant, used when delegating authentication to an external provider (Google, Facebook, GitHub, etc.) or a deployed authorization server (such as Keycloak, Okta, etc.).
Note: OAuth is not strictly an authentication protocol (even if used as such in “Login with Google/Facebook”) but an authorization one. For true authentication based on OAuth2, OpenID Connect (OIDC) is used, which adds an identity layer on top of OAuth2, providing an ID Token with user info.
E-commerce Scenario
- Register with email and password, or
- Log in with Google or another provider.
In the latter case, instead of storing the user's password directly, we redirect the user to Google’s login page for authentication. Once Google verifies the identity, it returns a code that we exchange for an access token. Using that token, we query Google’s API to obtain profile info (name, email, photo, etc.). We then create or find the user in our internal database and grant access.
Spring Boot Configuration (OAuth2 Client)
Spring Security 5 (and later) greatly simplifies OAuth2 configuration. To integrate with Google, we add to pom.xml:
<dependency>
    <groupId>org.springframework.boot</groupId>
    <artifactId>spring-boot-starter-oauth2-client</artifactId>
</dependency>
- application.yml
In the application.yml (or application.properties) file, you define the registration information and the provider.
An example using Google:
spring:
  security:
    oauth2:
      client:
        registration:
          google:
            client-id: TU_CLIENT_ID_DE_GOOGLE
            client-secret: TU_CLIENT_SECRET_DE_GOOGLE
            scope:
              - email
              - profile
            redirect-uri: "{baseUrl}/login/oauth2/code/google"
        provider:
          google:
            authorization-uri: https://accounts.google.com/o/oauth2/v2/auth
            token-uri: https://www.googleapis.com/oauth2/v4/token
            user-info-uri: https://www.googleapis.com/oauth2/v3/userinfo
- client-id and client-secret: These are the credentials you receive when registering your application in the Google API Console.
- scope: A list of user data that we will request from the provider (e.g., email, profile).
- redirect-uri: The URL where the provider will send the authorization code. "{baseUrl}/login/oauth2/code/google" is a placeholder that Spring automatically fills in based on your domain (e.g., https://www.paradigmadigital.com/login/oauth2/code/google).
- authorization-uri, token-uri, and user-info-uri: Specific Google URLs used to complete the OAuth2 flow (requesting permission, exchanging the code for a token, and retrieving the user's profile information, respectively).
- Security Configuration
Once the above properties are defined, you create a configuration class that extends WebSecurityConfigurerAdapter (for Spring Security versions < 6.x) or use the new declarative approach (starting with Spring Boot 3).
Here is the traditional approach:
@Configuration
@EnableWebSecurity
public class SecurityConfig extends WebSecurityConfigurerAdapter {

    @Override
    protected void configure(HttpSecurity http) throws Exception {
        http
            // Authorize certain endpoints
            .authorizeRequests()
            .antMatchers("/", "/login", "/error").permitAll()
            .anyRequest().authenticated()
            .and()
            // Configure OAuth2 login
            .oauth2Login()
                .defaultSuccessUrl("/home")
                .failureUrl("/login?error=true");
    }
}
This way, Spring Security handles the OAuth cycle:
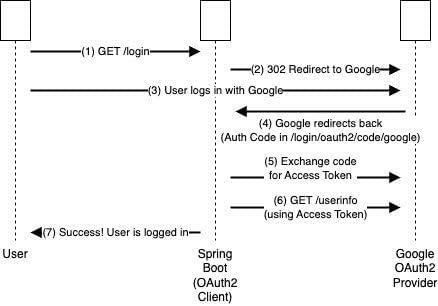
- When the user accesses /oauth2/authorization/google, they are redirected to Google.
- Google requests the user’s credentials.
- After logging in, the user is redirected to http://
/login/oauth2/code/google. - Spring exchanges the code for an access token. If the application requests offline permissions (
scope offline_access), Google also returns a refresh token. This token allows new access tokens to be obtained without requiring the user to log in again. - Spring Security retrieves user data from the Google User Info URI. If long-lived sessions are needed, the refresh token can be stored in the database to enable silent re-authentication.
- Internally, an
OAuth2Userobject is created and the user is logged into the application.
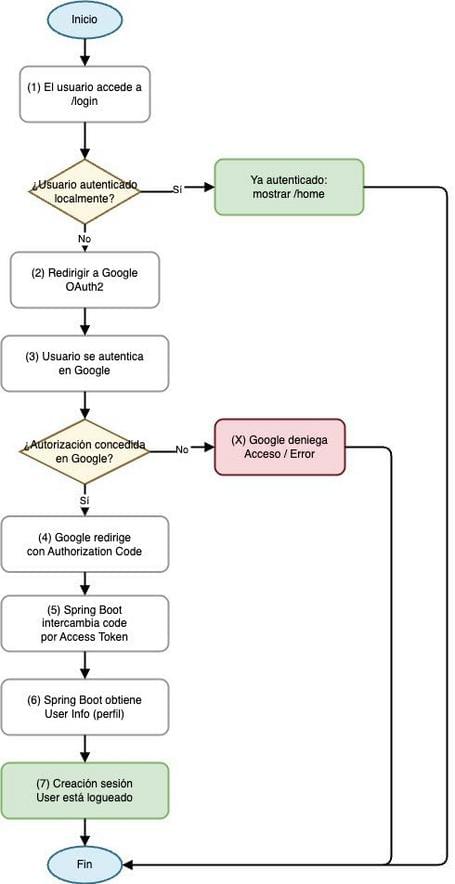
In a flow diagram, it would look like this:
Usage in Microservices
We could have our own Authorization Server, such as Keycloak, to handle both authentication and authorization. In a microservices environment, each service could:
- Validate the access token using introspection (/introspect endpoint) or by verifying a JWT signed by Keycloak.
- Assign access policies based on roles and OAuth scopes.
In an e-commerce system, this is especially useful if we want to:
- Allow external applications (third parties) to interact with our API with limited permissions.
- Provide unified authentication across different fronts (web, mobile, partners, etc.).
- Delegate security to a robust system that already implements refresh token flows, user management, logout, etc.
Conclusion on OAuth
OAuth is powerful and flexible, but can be more complex to configure and maintain, especially if managing your own authorization server. However, when integrating with external identity providers or delegating authentication to trusted services (e.g., Google), OAuth2 is an almost universal standard.
In the Next Post
Next, we'll dive into JWT details, a hybrid architecture example (OAuth2 + JWT), best practices, and a compelling comparison.
Let me know your thoughts in the comments 👇.
Comments are moderated and will only be visible if they add to the discussion in a constructive way. If you disagree with a point, please, be polite.


Tell us what you think.