We're reaching the 12th installment of our microservices architecture patterns series. As always, I encourage you to check out the full series of posts:
- Microservices Architecture Patterns: What Are They and What Benefits Do They Offer?
- Architecture Patterns: Organization and Structure of Microservices.
- Architecture Patterns: Microservices Communication and Coordination.
- Microservices Architecture Patterns: SAGA, API Gateway, and Service Discovery.
- Microservices Architecture Patterns: Event Sourcing and Event-Driven Architecture (EDA).
- Microservices Architecture Patterns: Communication and Coordination with CQRS, BFF, and Outbox.
- Microservices Patterns: Scalability and Resource Management with Auto Scaling.
- Architecture Patterns: From Monolith to Microservices.
- Externalized Configuration.
- Architecture Patterns in Microservices: Consumer-Driven Contract Testing
- Microservices Architecture Patterns: Security
Let's pick it up again
In the previous post, we introduced security patterns and explored Token-based Authentication and OAuth (Open Authorization).
In this post, we continue with JWT.
Note: The code examples are meant to illustrate the concepts. Some parts may be incomplete or contain demo snippets that wouldn't apply to real-world environments.
JWT (JSON Web Tokens)
Overview and structure
JSON Web Tokens (JWT) is a standard (RFC 7519) for securely representing claims using JSON and digital signatures. A typical JWT consists of three parts:

- Header: specifies the signing algorithm (e.g., HS256, RS256) and the token type (JWT).
Header (Base64-url): {"alg":"HS256","typ":"JWT"}
- Payload: contains the claims, which are the data describing the subject (sub), the expiration time (exp) in timestamp format, the issuer (iss), roles, etc.
Payload (Base64-url): {"sub":"5","email":"usuario@demo.com","roles":["ROLE_USER"],"exp":1700515039}
- Signature: generated by applying a cryptographic algorithm with a secret key or a key pair (private/public) to the Header + Payload.
Signature (Base64-url): generated using HMAC-SHA256.
Once formed, a JWT might look like this (simplified):
eyJhbGciOiJIUzI1NiIsInR5cCI6IkpXVCJ9
.
eyJzdWIiOiI1IiwiZW1haWwiOiJ1c3VhcmlvQGRlbW8uY29tIiwicm9sZXMiOlsiUk9MRV9VU0VSIl0sImV4cCI6MTcwMDUxNTAzOX0
.
NLk__3FHxpb3ZzRdC0s5EZhWpTnzKnLxK4bEB-tkL28
e-Commerce Scenario
Let’s assume our e-commerce platform includes an authentication service that, instead of issuing opaque tokens and storing them in a database, directly issues signed JWTs.
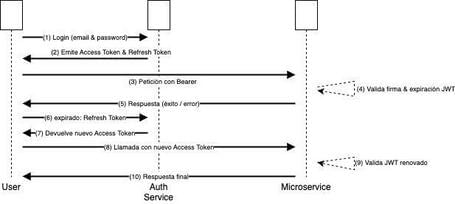
The sequence diagram:
- The client sends credentials to POST /auth/login.
- The Auth Service validates the credentials and generates a JWT with user ID, email, roles, and expiration date.
- The client stores the JWT locally (in a secure localStorage, an HttpOnly cookie, etc.).
- Every time it accesses a microservice (Cart, Orders, Catalog), it includes the JWT in the Authorization: Bearer
header. - The microservice, upon receiving the token, validates the signature and expiration, extracts the claims, and decides whether the user is allowed to perform the operation.

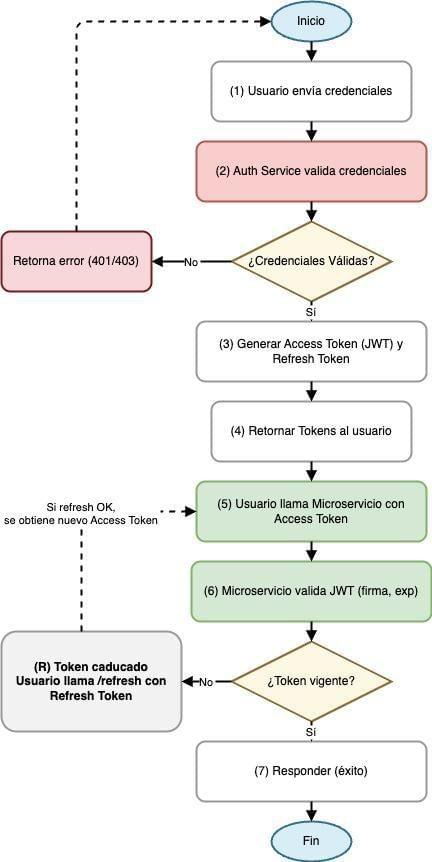
The flow diagram:

The process is the same, but with a bit more detail:
- Start.
- (1) The user sends their credentials to the Auth Service.
- (2) The Auth Service validates them against its database.
- Are the credentials valid?
- Yes: (3) Generate Access Token (JWT) and Refresh Token.
- No: Return an error (401/403) and terminate.
- (4) Return those tokens to the user.
- (5) The user calls a microservice (e.g., Cart) with the Access Token.
- (6) The microservice locally validates the JWT signature and expiration.
- Is the token valid?
- Yes → (7) Operation successful: response returned to user.
- No → Token is expired or invalid: the user uses the Refresh Token ((R)) to request a new Access Token from the Auth Service.
- If the Refresh Token is valid, the user receives a new Access Token and retries the microservice call (go back to step (5) in the diagram).
- End of process.
The big advantage: we don’t need to call the Auth Service on every request.
The main disadvantage is that if we want to revoke a token before it expires, we need to implement an additional strategy (blacklist, password change, very short expiration intervals, etc.).
Implementation in Spring Boot
In this section, we’ll walk through how to integrate JWT (JSON Web Tokens) into a Spring Boot application step-by-step.
Dependencies
To begin, it’s essential to include the necessary dependencies for Spring Security and a library to handle JWT tokens. Typically, these are:
- spring-boot-starter-security, for managing security in Spring.
- io.jsonwebtoken:jjwt, a popular library for generating and validating JWTs in Java.
These dependencies allow the project to configure endpoint protection using Spring Security and to sign and parse JWT tokens.
<dependency>
    <groupId>org.springframework.boot</groupId>
    <artifactId>spring-boot-starter-security</artifactId>
</dependency>
<dependency>
    <groupId>io.jsonwebtoken</groupId>
    <artifactId>jjwt</artifactId>
    <version>0.9.1</version>
</dependency>
Class for Generating JWT (JwtTokenProvider)
At this point, we create a class (e.g., JwtTokenProvider) responsible for generating the token once the user has successfully authenticated.
Typically, a method like generateToken(Authentication authentication) is used, which:
- Extracts data from the authenticated principal (e.g., UserDetails with username, roles, etc.).
- Determines the issuedAt and expiration dates.
- Applies a digital signature using HMAC (with a shared secret key) or RSA/EC (with a private/public key pair).
- Returns a string in JWT format that includes the header, payload (claims), and signature.
The token's payload usually contains:
- sub (subject): the user's identifier (userId or email).
- roles: a list of roles or permissions.
- exp: the expiration date to ensure the token doesn’t remain valid indefinitely.
This class is also responsible for:
- Verifying the token's signature and temporal validity using a method like validateToken(String token).
- Extracting information from the payload (e.g., the username) using the method getUsernameFromJWT(String token).
@Service
public class JwtTokenProvider {

    private final String jwtSecret = "MiSuperSecreto";
    private final long jwtExpirationInMillis = 3600000; // 1 hora

    // Create JWT based on user data
    public String generateToken(Authentication authentication) {
        UserDetails userDetails = (UserDetails) authentication.getPrincipal();

        Date now = new Date();
        Date expiryDate = new Date(now.getTime() + jwtExpirationInMillis);

        // Example: claims: subject, roles, email, etc.
        return Jwts.builder()
                .setSubject(userDetails.getUsername()) // Podría ser "email" o "userId"
                .setIssuedAt(now)
                .setExpiration(expiryDate)
                .signWith(SignatureAlgorithm.HS256, jwtSecret)
                .compact();
    }

    // Validate JWT
    public boolean validateToken(String token) {
    try {
        Jwts.parser().setSigningKey(jwtSecret).parseClaimsJws(token);
        return true;
    } catch (ExpiredJwtException e) {
        System.out.println("El token ha expirado.");
    } catch (SignatureException e) {
        System.out.println("Firma del token inválida.");
    } catch (MalformedJwtException e) {
        System.out.println("Token mal formado.");
    }
    return false;
}

    // Get 'subject' (usually username o userId)
    public String getUsernameFromJWT(String token) {
        Claims claims = Jwts.parser().setSigningKey(jwtSecret)
                .parseClaimsJws(token).getBody();
        return claims.getSubject();
    }
}
JWT Authentication Filter
For each HTTP request, we need to intercept the Authorization header and, if a JWT token exists, validate it. This is done with a filter that extends OncePerRequestFilter:
@Component
public class JwtAuthenticationFilter extends OncePerRequestFilter {

    @Autowired
    private JwtTokenProvider tokenProvider;

    @Override
    protected void doFilterInternal(HttpServletRequest request,
                                    HttpServletResponse response,
                                    FilterChain filterChain)
                                    throws ServletException, IOException {
        String header = request.getHeader("Authorization");
        if (header != null && header.startsWith("Bearer ")) {
            String token = header.substring(7);
            if (tokenProvider.validateToken(token)) {
                String username = tokenProvider.getUsernameFromJWT(token);

                // Load more user details, e.g. roles.
                // We could have them in the database or encoded in the token claims..
                // Here we take on an exemplary role:
                UserDetails userDetails = new User(
                        username,
                        "",
                        Collections.singletonList(new SimpleGrantedAuthority("ROLE_USER”))
                );

                UsernamePasswordAuthenticationToken authToken =
                        new UsernamePasswordAuthenticationToken(userDetails, null, userDetails.getAuthorities());

                SecurityContextHolder.getContext().setAuthentication(authToken);
            }
        }
        filterChain.doFilter(request, response);
    }
}
Security Configuration
In SecurityConfig (either by extending WebSecurityConfigurerAdapter or using the newer bean-based approach), we register the JWT filter and define which endpoints should be secured or publicly accessible:
@Configuration
@EnableWebSecurity
public class SecurityConfig extends WebSecurityConfigurerAdapter {

    @Autowired
    private JwtAuthenticationFilter jwtAuthenticationFilter;

    @Override
    protected void configure(HttpSecurity http) throws Exception {
        http.csrf().disable()
            .authorizeRequests()
            .antMatchers("/auth/login", "/auth/register").permitAll()
            .anyRequest().authenticated()
            .and()
            .addFilterBefore(jwtAuthenticationFilter, UsernamePasswordAuthenticationFilter.class);
    }
}
Authentication Controller
Finally, we need a controller to handle the login process, where:
- The user's credentials (username/password) are received.
- Authentication is performed using the AuthenticationManager.
- If authentication is successful, the
tokenProvidergenerates a JWT. - The generated token is returned in the response.
@RestController
@RequestMapping("/auth")
public class AuthController {

    @Autowired
    private AuthenticationManager authenticationManager;

    @Autowired
    private JwtTokenProvider tokenProvider;

    @PostMapping("/login")
    public ResponseEntity<?> authenticateUser(@RequestBody LoginRequest loginRequest) {
        // We authenticate with Spring's ‘AuthenticationManager’
        Authentication authentication = authenticationManager.authenticate(
                new UsernamePasswordAuthenticationToken(
                        loginRequest.getUsername(),
                        loginRequest.getPassword()
                )
        );
        SecurityContextHolder.getContext().setAuthentication(authentication);

        // Generamos el JWT
        String jwt = tokenProvider.generateToken(authentication);
        return ResponseEntity.ok(Collections.singletonMap("token", jwt));
    }
}
JWT: Pros and Cons
Pros:
- Scalable: each microservice validates the token locally.
- Loosely coupled: no need to query a central server or database.
- JSON is easy to decode on any platform or language.
Cons:
- Complex revocation: if a user is blocked, the token must be explicitly invalidated (e.g. blacklist) or use short expirations.
- Tokens can grow in size if too many claims are included.
- Secure key handling is critical: if the key is leaked, anyone could sign valid tokens.
Hybrid Architecture Example (OAuth2 + JWT) in e-Commerce
In many cases, several patterns are combined. For example:
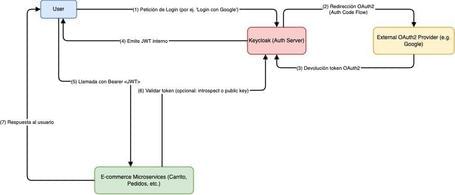
- An Authorization Server (e.g., Keycloak) handles OAuth2 authentication.
- Once authenticated, the user receives an Access Token that is actually a JWT signed by Keycloak.
- Each microservice validates the token's signature locally.
This provides the best of both worlds:
- Simplicity of local validation (thanks to JWT).
- Ability to integrate external providers and manage users, roles, admin consoles, etc. (thanks to OAuth2).
In an e-commerce scenario, we could:
- Allow “Login with Google” and “Login with Facebook” (OAuth2) via Keycloak.
- Keycloak issues a JWT containing roles and scopes.
- Our microservices (Cart, Orders, Catalog) receive the JWT and validate it without needing to contact Keycloak continuously.
This approach reduces barriers for new users (e.g., no need to create a new account—just use Google) and maintains efficient token validation.

Advanced Considerations and Best Practices
Handling Refresh Tokens
In both Token-based and JWT strategies, you can implement refresh token logic to avoid forcing users to re-login constantly. The idea is:
- Generate two tokens:
- Access Token (short-lived, e.g., 15 minutes).
- Refresh Token (longer-lived, e.g., 7 days).
- When the Access Token expires, the client uses the Refresh Token to request a new one.
- You can invalidate the Refresh Token when the user logs out or if suspicious activity is detected.
- This reduces the risk of having a long-lived Access Token* that, if stolen, could grant prolonged access.
Token Revocation
- In Token-based systems with storage (Redis/DB), revoking a token is as simple as deleting it from the store.
- In JWT, revocation is trickier. Some strategies include:
- Blacklist: maintain a registry of invalid tokens (token ID, expiration), but this requires querying the list.
- Change signing key: revokes all tokens at once, useful in a security breach.
- Short expiration + Refresh Tokens: minimizes the attack window.
Asymmetric vs Symmetric Signing
JWT can use either a shared secret (HMAC) or asymmetric key pairs (RSA/ECDSA).
- HMAC is simpler to configure but requires the same secret in all microservices.
- RSA/ECDSA allows each microservice to only know the public key, while the private key stays with the Auth Service.
Key Storage Security
You should never store the signing key in plain text within the code repository. Use a secret manager (Vault, AWS Secrets Manager, etc.) or environment variables. In production environments, key security is critical to prevent token forgery.
HTTPS / TLS
Always encrypt the communication channel. Use TLS (HTTPS) for both external interactions and internal microservice communications (if feasible). Without encryption, attackers could steal tokens (JWT or otherwise).
Logging and Auditing
In e-commerce, it's common to require audit logs to track sensitive actions (purchases, cancellations, product changes). Including user data (ID, roles) in logs improves traceability and compliance.
Integration with API Gateway
In many microservices architectures, an API Gateway (e.g., Spring Cloud Gateway or NGINX) is used. The Gateway can intercept requests and verify tokens before routing to internal microservices.
This simplifies security logic, as you don't need to add authentication filters in each microservice (though they may still have additional validation if needed).
Final Comparison Between Patterns
| Feature | Token-based Auth | OAuth2 | JWT |
|---|---|---|---|
| Ease of implementation | Relatively simple | Moderate to high (multiple flows) | Moderate (requires signing and parsing tokens) |
| Typical scenario | Internal apps, small/medium projects | Login with external providers, delegation to a server | Microservices with local validation, scalability |
| Need for central service | Optional (if token is validated in store) | Yes (Authorization Server) | Only for issuance, validation can be decentralized |
| Revocation | Easy if token is stored in DB/Redis | Via the Authorization Server | Requires blacklists or short expiration |
| Token size | Usually small (UUID) | Depends on provider (can be opaque token) | Can grow with number of claims |
| Use of claims | Optional (can store only an ID) | Yes, in some flows (depends on ID Token) | Strong, claims defined in payload |
- Token-based Auth: ideal for projects with simple requirements, or when very precise control over token revocation is needed via a central database.
- OAuth2: essential if you need to allow “Login with Google” or if your company already uses an Identity Provider. Useful when different apps require single sign-on (SSO).
- JWT: very popular in microservices architectures, avoids frequent calls to a central server, but token revocation is more complex.
Conclusions and Recommendations
- Choosing the right pattern depends on your requirements: usability, external integrations, scalability, and credential revocation.
- Token-based Auth is simple to start with and easy to understand, but it may require a central store for revocation.
- OAuth2 is the standard for delegating authentication to external providers, or allowing third-party apps to access your APIs with a specific permission scope. It’s more complex but extremely powerful in enterprise environments.
- JWT provides the advantage of decentralized verification. That’s why it’s widely used in microservices. However, it requires a careful approach to revocation and key management.
- In any application, security is not limited to authentication and authorization. You should also apply practices such as:
- Encryption in transit (HTTPS).
- Encryption at rest (sensitive data in databases).
- Monitoring and logging (logs containing user info, IP, timestamps).
- Protection against brute-force or injection attacks.
Always evaluate your workload, architecture, user experience, and system complexity before choosing a pattern. In many cases, a combination of approaches is the best solution.
In complex applications that handle transactions and personal data, it's crucial to carefully design the access and token management flow.
Security in a microservices architecture is a broad topic, covering authentication, authorization, data integrity, and protection against multiple attack vectors.
In the end, the best choice depends on your business context, tech stack, and scalability/security requirements. Many production systems combine, for example, OAuth2 with JWT issuance, and a central API gateway that intercepts and verifies requests to simplify the architecture for internal microservices.
Regardless of your approach, security must always be a priority from the early design stages, ensuring a systematic and robust strategy that protects the confidentiality, integrity, and availability of your services — and above all, your customers' data.
We're Not Done Yet
We hope you enjoyed this security section — there’s much more to explore. In the next post, we’ll cover fault tolerance patterns, which, as the name suggests, allow systems to remain functional even when some components fail or crash.
References and Recommended Reading
- RFC 6749 - The OAuth 2.0 Authorization Framework.
- RFC 7519 - JSON Web Token (JWT).
- Spring Security OAuth2 Official Docs.
- Spring Security JWT Official Docs.
- Keycloak Guide for Identity and Access Management.
Comments are moderated and will only be visible if they add to the discussion in a constructive way. If you disagree with a point, please, be polite.


Tell us what you think.