Everyone knows that AI has been trending for a while now (seriously, who hasn’t heard of ChatGPT, DeepSeek, or Gemini by now?!). Considering the vast existing Spring/Java community and the thousands of companies running applications on this technology who want to jump on the AI wave… what better way to integrate it than simply adding a dependency or module—avoiding the headaches of working with different frameworks and/or technologies? That’s why we’re diving into this AI module to explore everything it has to offer.
When we look at the Spring AI documentation, we see that it includes several sections that we’ll review to understand what each one brings to the table during development.
The documentation itself states that the purpose of Spring AI is to integrate enterprise data and APIs with AI models.
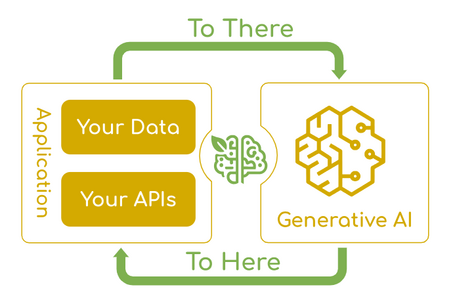
AI Concepts
Spring AI provides us with many advantages. But first, from the perspective of a Spring developer unfamiliar with AI fundamentals, the documentation recommends learning certain terms to better understand how Spring AI works. These concepts are:
1 Models
Models are basically algorithms designed to process and generate information in a way that mimics the human brain. These algorithms can extract patterns from data to make predictions, create text, images, and solve other kinds of problems.
Currently, Spring AI supports inputs and outputs such as language, images, and audio, in addition to vectors/embeddings for more advanced use cases.
2 Prompts
Prompts serve as a foundation to guide the model toward specific outputs. In this case, you shouldn’t think only about text input, but also about the "roles" associated with that input to provide context. For example: "You are a meteorologist. Tell me the weather forecast for today." To simplify this interaction, prompt templates are often used, such as: "Tell me a
3 Embeddings
Embeddings are numerical representations of text, images, or videos that capture the relationships between inputs. They transform inputs into arrays of numbers called vectors, which are designed to reflect the meaning of those inputs. By calculating the distance between the vector representations of, say, two texts, we can determine their similarity.
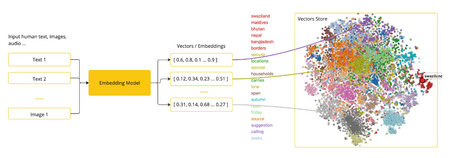
4 Tokens
Tokens can be thought of as the smallest unit of information used by an LLM to function. To process input, LLMs convert words into tokens (a token corresponds roughly to 75% of a word), and to generate output, tokens are converted back into words.

Tokens are important in LLMs because they form the basis for billing (input and output tokens), and they also define each model’s usage limits. That is, every model has token limits that can be specified in the input.
With these basic concepts in mind, let’s dive into the features of Spring AI and what it enables.
ChatClient
The ChatClient offers an API to communicate with the AI model via methods that allow you to construct the different parts of the prompts.
Creating a ChatClient
It can be created via autoconfiguration or programmatically:
- Autoconfiguration: Spring Boot’s autoconfiguration creates a ChatClient.Builder bean that can be injected into your classes.
@RestController
public class TravelController {

    private final ChatClient chatClient;

    public TravelController(ChatClient.Builder chatClientBuilder) {
        this.chatClient = chatClientBuilder.build();
    }

    @GetMapping("/travel-recommendation")
    String generation(@RequestBody String userInput) {
        return this.chatClient.prompt()
            .user(userInput)
            .call()
            .content();
    }

}
- Programmatic: the default ChatClient.Builder can be disabled using the property spring.ai.chat.client.enabled=false. This is especially useful when working with multiple models simultaneously. An example of creating a ChatClient.Builder programmatically would be:
public class ChatClientCodeController {

    private ChatModel myChatModel;

    private ChatClient chatClient;

    public ChatClientCodeController(ChatModel myChatModel) {
        this.myChatModel = myChatModel;
        this.chatClient = ChatClient.create(this.myChatModel);
//        this.chatClient = ChatClient.builder(this.myChatModel).build();
    }

    @GetMapping("/chat-client-programmatically")
    String chatClientGeneration(@RequestBody String userInput) {
        return this.chatClient.prompt()
            .user(userInput)
            .call()
            .content();
    }
}
ChatClient Responses
- ChatResponse: the model's response is a ChatResponse structure that includes metadata about how the response was generated, along with multiple “responses” known as Generations.
@GetMapping("/travel-recommendation/chat-response")
ChatResponse travelRecommendationResponse(@RequestBody String userInput) {
    return this.chatClient.prompt()
          .user(userInput)
          .call()
          .chatResponse();
}
- Entity: sometimes you may want to return an entity based on the String response. For this, the method entity() is available:
@GetMapping("/travel-recommendation/entity")
TravelRecommendation travelRecommendationEntity(@RequestBody String userInput) {
    return this.chatClient.prompt()
        .user(userInput)
        .call()
        .entity(TravelRecommendation.class);
}
public class TravelRecommendation {

    private List<City> cities;

}
public class City {

    private String name;

}
Default Configurations
By using default configurations, it is possible to only provide the user input at runtime. For example, to set the system input (with or without parameters). The system input defines the basic behavior of the agent, such as limiting the scope to a specific topic and acting as a travel chatbot, and can be configured as follows:
@Bean
ChatClient chatClient(ChatClient.Builder builder) {
         return builder.defaultSystem("You are a travel chat bot that only recommends 3 cities under 50000 population")
       .build();
}
@Bean
ChatClient chatClient(ChatClient.Builder builder) {
    return builder.defaultSystem("You are a travel chat bot that only recommends 3 cities under {population} population")
       .build();
}
@GetMapping("/travel-recommendation-population")
String travelRecommendationPopulation(@RequestBody String userInput, @RequestParam Long population) {
    return this.chatClient.prompt()
                .system(sp -> sp.param("population", population))
                .user(userInput)
                .call()
                .content();
}
Other default configurations already present in the ChatClient.Builder, which can also be overridden at runtime using similar methods, include:
- defaultOptions: generic or model-specific options (OpenAI, Mistral, Ollama, etc.).
- defaultFunction/defaultFunctions: used to find the correct function for accurate responses.
- defaultUser: allows defining the user’s input in various ways.
- defaultAdvisors: used to create Advisors that modify the data used in the prompt.
Models
For model communication, Spring AI provides an API. This API supports Chat models, Text to Image, Audio Transcription, Text to Speech, and Embeddings, both synchronously and asynchronously. It also offers model-specific functionalities. It supports models from various providers such as OpenAI, Microsoft, Amazon, Google, Hugging Face, among others.

We'll begin by focusing on chat-related functionalities, but you can see that the operation for other models is quite similar.
Chat Model API
This API enables you to integrate chat functionalities using AI via LLMs to generate natural language responses.
It works by sending a prompt to the AI model, which then generates a response to the conversation based on its training data and understanding of natural language patterns. Upon receiving the response, it can be returned directly or used to trigger additional functionality. The API is designed with simplicity and portability in mind, to facilitate seamless interaction across different models.
API Overview
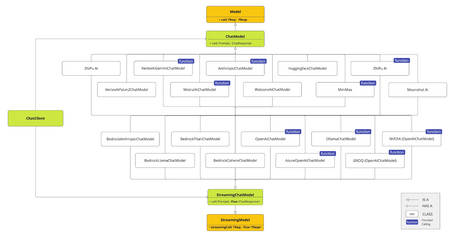
Below are the main classes in this API:
- ChatModel: interface with the call method to interact with LLMs. There is also a streaming version, StreamingChatModel, which provides the stream method.
public interface ChatModel extends Model<Prompt, ChatResponse> {

    default String call(String message) {...}

    @Override
    ChatResponse call(Prompt prompt);
}
- Prompt: implements the ModelRequest class, which includes a list of messages (Message) as well as additional customization options through the ChatOptions class.
public class Prompt implements ModelRequest<List<Message>> {

    private final List<Message> messages;
    private ChatOptions modelOptions;

    @Override
    public ChatOptions getOptions() {...}

    @Override
    public List<Message> getInstructions() {...}

}
- Message: interface that includes the prompt context along with metadata, and its categorization via MessageType. Multimodal messages also implement the MediaContent interface, providing a list of Media.
public interface Content {

    String getContent();

    Map<String, Object> getMetadata();
}

public interface Message extends Content {

    MessageType getMessageType();
}

public interface MediaContent extends Content {

    Collection<Media> getMedia();
}
There are several implementations of Message that correspond to the categories the models can process.
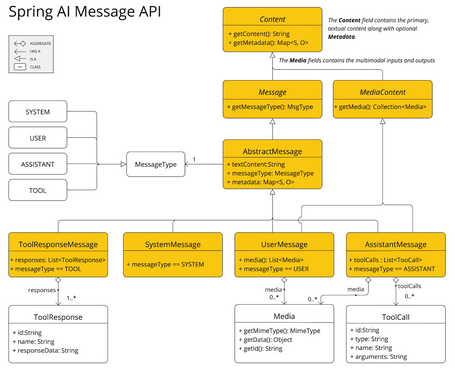
Before sending the message to the LLM, different roles (system, user, function, assistant) are distinguished using MessageType to determine how the message should behave. In certain models that don’t support roles, UserMessage acts as the standard or default category.
- ChatOptions: a subclass of ModelOptions that contains various options you can pass to the model. Additionally, each specific model may have its own unique options to configure.
public interface ChatOptions extends ModelOptions {

    String getModel();
    Float getFrequencyPenalty();
    Integer getMaxTokens();
    Float getPresencePenalty();
    List<String> getStopSequences();
    Float getTemperature();
    Integer getTopK();
    Float getTopP();
    ChatOptions copy();
}
All of this allows you to override the options passed to the model at runtime for each request, while having a default configuration for the application, which provides greater flexibility.
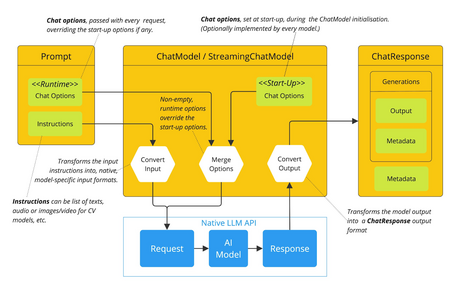
The interaction flow with the model would be:
- Initial configuration of ChatOptions acting as default values.
- For each request, ChatOptions can be passed to the prompt overriding the initial settings.
- The default options and those passed in each request are merged, with the latter taking precedence.
- The passed options are converted to the native format of each model.
- ChatResponse: class that contains the model output, where multiple responses may exist for a single prompt. This class also includes metadata from the model's response.
public class ChatResponse implements ModelResponse<Generation> {

    private final ChatResponseMetadata chatResponseMetadata;
    private final List<Generation> generations;

    @Override
    public ChatResponseMetadata getMetadata() {...}

    @Override
    public List<Generation> getResults() {...}
}
Since the ChatModel API is built on top of the generic Model API, it allows us to switch seamlessly between different AI services while keeping the same code.
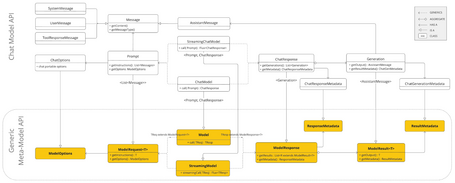
In the following image, you can see the relationships between the different classes of the Spring AI Model API:
Model Comparison
The documentation includes a section comparing the different models based on their features:
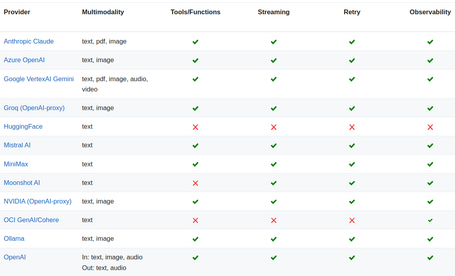
For the implementation examples, Ollama has been selected because it offers a wide range of features and, most importantly, because it allows for local execution, helping avoid costs associated with most public models.
Ollama
With Ollama, you can run various LLMs locally. This section will cover some important topics for configuring and using it.
Prerequisites
Create an Ollama instance via:
- Installing Ollama locally
- Configuring Ollama with TestContainers
- Connecting to an Ollama instance using Kubernetes Service Bindings
Installing Ollama locally
To explore what Ollama offers, we’ll install a local instance on our machine. Simply download Ollama from the official site (in this case, we’ll use Linux - Ubuntu).
curl -fsSL https://ollama.com/install.sh | sh
Once Ollama is downloaded (this may take some time), you need to download a model. In this case, we’ll run the llama3.2:1b model (although you can see that many others with different features are available) since it is lighter, using the following command:
ollama run llama3.2:1b
As you can see when running the previous command, the prompt to interact with the model is already displayed:

You can then ask it questions:

Autoconfiguration
Spring AI provides autoconfiguration for Spring Boot for integrating Ollama via the following dependency:
<dependency>
    <groupId>org.springframework.ai</groupId>
    <artifactId>spring-ai-ollama-spring-boot-starter</artifactId>
</dependency>
For this autoconfiguration, you can define base properties or chat properties for different functionalities, with some of the most important being:
| Property | Description | Default |
|---|---|---|
| spring.ai.ollama.base-url | URL where the Ollama server is running | localhost:11434 |
| spring.ai.ollama.init.pull-model-strategy | Whether and how to download models at application startup | never |
| spring.ai.ollama.init.chat.additional-models | Additional models beyond the one configured by default in the properties | [ ] |
| spring.ai.ollama.chat.enabled | Enable the Ollama chat model | true |
| spring.ai.ollama.chat.options.model | Name of the model to use | mistral |
| spring.ai.ollama.chat.options.num-ctx | Sets the size of the context window used to generate the next token | 2048 |
| spring.ai.ollama.chat.options.top-k | Reduces the probability of generating nonsensical responses. A high value (100) gives more diverse responses, while a lower value (10) is more conservative | 40 |
| spring.ai.ollama.chat.options.top-p | Works together with the top-k property. A high value (0.95) results in more diverse responses, while lower values (0.5) yield more focused and conservative outputs | 0.9 |
| spring.ai.ollama.chat.options.temperature | Sets the model's temperature. Higher values make the model respond more creatively | 0.8 |
Runtime Options
At runtime, you can override the default options to send to the prompt, such as the "temperature":
@GetMapping("/city-name-generation")
String cityNameGeneration() {
    return chatModel
        .call(new Prompt("Invent 5 names of cities.",
            OllamaOptions.builder()
                .model(OllamaModel.LLAMA3_2_1B)
                .temperature(0.4)
                .build()))
        .getResult().getOutput().getText();
}
Model Downloading
Spring AI Ollama can automatically download models when they are not available in the Ollama instance. There are three ways to download models:
- always: always download the model, even if it already exists. Useful to always use the latest version.
- when_missing: download the model only if it’s not already available.
- never: never download the model automatically.
In the following image, you can see how a missing model is downloaded at application startup:

Models defined via properties can be downloaded at startup by specifying properties like the strategy type, timeout, or maximum number of retries:
spring:
  ai:
    ollama:
      init:
        pull-model-strategy: always
        timeout: 60s
        max-retries: 1
It’s also possible to launch additional models at startup to be used later during runtime:
spring:
  ai:
    ollama:
      init:
        pull-model-strategy: always
        chat:
          additional-models:
            - llama3.2
            - qwen2.5
There is also the possibility to exclude certain types of models:
spring:
  ai:
    ollama:
      init:
        pull-model-strategy: always
        chat:
          include: false
Ollama APIClient
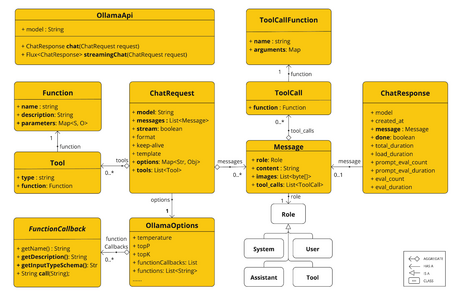
As an informational note, the following image shows the interfaces and classes in the Ollama API (although using this API is not recommended. Instead, it's better to use OllamaChatModel):
Conclusion
We’ve covered some of the key concepts to consider when working with LLMs, as well as the main Spring AI APIs that enable us to interact with them. It’s clear that this module is designed in an abstract way to allow integration with the latest LLMs (OpenAI, Gemini, Anthropic, Mistral, etc.), with a special focus on Ollama due to its wide range of features, local execution capability, and no mandatory usage costs.
In future posts, we’ll continue exploring other parts of the module as we move forward in building and integrating AI-powered applications with Spring.
References
Comments are moderated and will only be visible if they add to the discussion in a constructive way. If you disagree with a point, please, be polite.


Tell us what you think.