We recently talked about how to patch machines with AWS System Manager, and we raised a problem with auto-scaling groups or Auto Scaling Groups.
The problem is that if we update an instance that belongs to an Auto Scaling Group, the update itself can be detected as a service outage and replace the updated instance with a new instance without updating. Even if we manage to update the instance by pausing the Auto Scaling Group processes, we still encounter problems because if it is necessary to launch a new instance, this latest instance will not update due to any Auto Scaling Group event.
We may think that it is a good idea to add an update in the boot process of a new instance, but this can cause the versions used to not be the same in all instances, which can be a big problem, as well as adding time from when an autoscaling event is detected until the instance is active.
Then we get to a point where we can't update our instances within Auto Scaling Groups, which could be a better idea. And this is where EC2 Image Builder comes in to help us.
What is EC2 Image Builder?
EC2 Image Builder is an AWS-managed service that allows us to build custom images on AWS in a simple and fully automated way.
Years ago, in AWS, generating a custom image was done by raising an EC2 instance and running our customization. It was also possible to add this customization at the startup of our instances, but the options could have been more efficient in the case of Auto Scaling Groups. For this reason, in 2019, AWS launched this service, which allows us to generate the image automatically.
The service generates an EC2 instance, executes the automation we tell it to, and generates a new image or AMI (Amazon Machine Image).
It is an entirely free service, which only bills the AWS services used, since it will raise a temporary instance to generate the AMI and create the AMI storage.
This service has many uses, but we will focus on how to update our Auto Scaling Group Images. We could use it for many more things.
Now Go Build
As with Patch Manager, the best way to see how simple this service is to start deploying it, so we will see how we use EC2 Image Builder to build and keep an Amazon Linux 2023 AMI up to date.
EC2 Image Builder Component
The first thing we need is the EC2 Image Builder Component. A Component is an automation that uses AWSTOE (AWS Task Orchestrator and Executor) so that by defining a straightforward YAML, we can generate any automation to install components, update them, or any action that occurs within a server.
In EC2 Image Builder, AWS already generates components, and there are two quite interesting for our use case: update-linux and update-windows. It would be perfect if we didn't want to exclude patches, since they patch the instance to the last level.
But in this case, we are going to want to be able to exclude a specific patch.
For this reason, we are going to see how to generate a Component.
- There are two types of Components. In this case, we will generate a Component of type Build.

- We have to define the type of Operating System and the chosen versions. For example, we can create a component valid for all supported versions of Linux. Also, define a version for our Component, since we can update it.
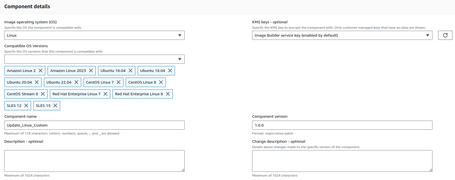
- The last part is to define the configuration of our component.
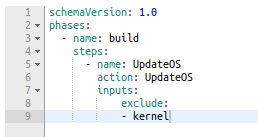
- It is a straightforward language that allows many Actions. In our case, we will only use UpdateOS, which helps us to update the Operating System.
We simply have to define the phases, being Build the only one we need in this case (we can create a Test phase if we want) and the action we want to execute in that step. We will define an exclusion from Kernel patches, but we could add any other exception.
We are using the actionUpdateOS, but we could add more actions to customize, using other actions like ExecuteBash or ExecutePowerShell to run a Stronghold script.
EC2 Image Builder Recipe
Once we have a Component, we must generate a recipe for our AMI.
This resource is the one that defines what our AMI is going to have and what Components we are going to execute.
As in the previous case, we have to define a name and version.

In this case, define the Operating System to use and the version:
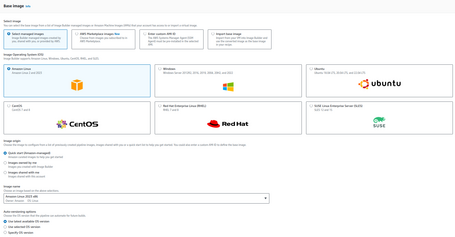
If we want to use multiple versions or Operating Systems, we have to generate multiple recipes, one for each witch that we will generate.
Additionally, we can define the configuration of the instance and even add a script in the automatic start:
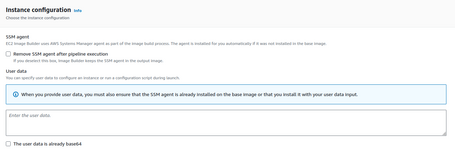
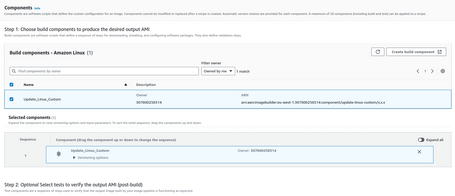
Here, we choose the Components to install. In our case, we are going to select the one we have generated:
We also define the storage size of our Image:

Now, we already have our recipe configured with everything we require.
EC2 Image Builder pipelines
The last EC2 Image Builder component is the main one, which is the pipeline itself for the generation of the images and allows them to be generated automatically.
As in the previous resources, we define the general parameters:
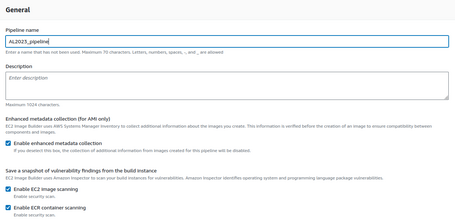
EC2 Image Builder has integration with Amazon Inspector so that we can analyze the vulnerabilities of our generated images to solve them.
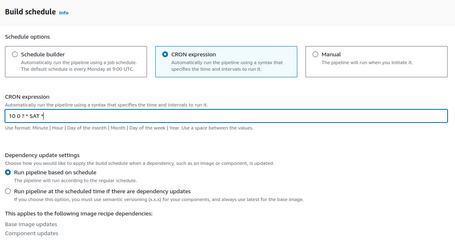
We define the execution schedule of this pipeline. In our case, we are going to use an CRON expression, although we could generate it manually and call it by other means (EventBridge, for example):
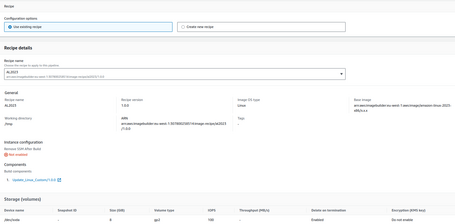
And we define which recipe we are going to use.
You can define the infrastructure to use. In our case, we will use the standard configuration:
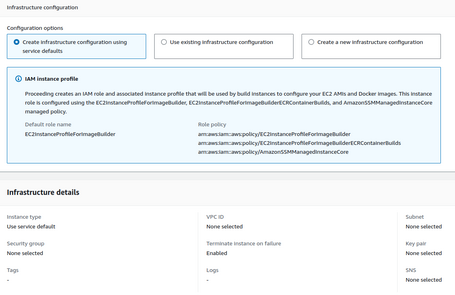
We can also configure specific options such as the region used, KMS, the AMI name, Share the AMI, etc.

We can even define a Launch Template Configuration associated with this pipeline.
With these steps, we already have our pipeline, and we can execute it:

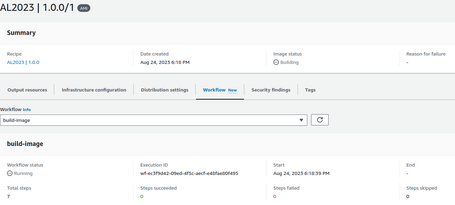
The pipeline spawns an instance to run the steps and create the AMI:

The process consists of several steps, including creating the AMI and deleting the generated environment:

In total, in this case, it has taken 5 minutes to execute all the steps. It will take more or less time, depending on the number of customizations we will run.
Once the process is finished, we will have a valid AMI that we can use:

Use cases
There are multiple architectures to carry out this process, and we can even generate a pipeline that performs all the tasks. This pipeline is the best alternative to execute the entire process fully automated.
But, for example, we can generate an architecture that responds to EC2 Image Builder events. For example, the EC2 Image Builder pipeline generates the image, and once finished, SNS (which integrates with EC2 Image Builder) invokes a Lambda Function. This Lambda captures the generated AMI data to update a Parameter Store that stores the ID of the latest AMI.
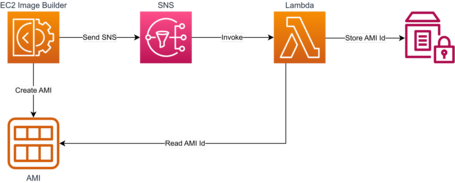
This method allows us to reference this parameter in our IaC templates to generate new versions of our Launch Template with the new AMI and release an update to our AutoScaling Groups.
We can do this in multiple ways, using IaC, the Instance Refresh option for AutoScaling Groups, or generating a pipeline to refresh our infrastructure. We can even launch these updates when EC2 Image Builder finishes creating the AMI using the integration with SNS. We can integrate SNS with multiple AWS services.
EC2 Image Builder is a handy tool for patching and generating AMIs automatically, allowing integration with other systems to automate the deployment of these new AMIs.
Besides the use case we've seen for Patch Manager, EC2 Image Builder gives us a lot of opportunities, as we can generate images with our customizations or with our own Harden that we generate.
We can also generate images by installing particular applications that we use and require our configurations. We can standardize environments and also gain agility when deploying them.
Also, when generating AMIs, we can share these AMIs with different accounts, and using other services such as Parameter Store or even DynamoDB. We can have the references of the latest version of the AMI for projects to use this version of our different AMIs.
One option is to centralize the generation of AMIs in a central account and share them at the organizational level, OU, or specific accounts. So, take advantage of this functionality in multiple projects.
Conclusion
Considering that this service is free, saves a lot of time, and is relatively easy to use, we highly recommend using it, so if you are not using it, take advantage and start now.
Comments are moderated and will only be visible if they add to the discussion in a constructive way. If you disagree with a point, please, be polite.


Tell us what you think.