In my Sysadmin days, one thing kept me awake (that's literal): keeping systems up to date.
It wasn't something complicated, but it was something that took a long time and had quite a few problems:
- It had to be done after hours (that's the reason I lost sleep).
- Likewise, it requires a lot of testing in the environment.
- Downloading the updates required time (download capacity was limited).
- It was unusual to have internet access from the servers.
- Setting up a private repository required much time and a careful review of the licensing issue.
- Tools that allow some automation were costly.
When I came to the AWS world, I discovered AWS Systems Manager, and I thought how good it would have been for me in my previous years.
That is why we will see how to use AWS System Manager to keep an environment updated and up-to-date.
What is AWS System Manager?
AWS System Manager is defined as an operations center for AWS applications and resources, allowing automated management of our environment.
In addition, AWS System Manager allows you to manage both instances within AWS and On-Prem servers.
AWS System Manager has many capabilities, or by-products, that do different things.
Many operations tasks can be automated from System Manager, as it allows you to run scripts within instances, inventory instances and installed software, schedule maintenance windows, and even access instances without using SSH or RDP (using AWS IAM).
Today, we will focus on AWS Systems Manager Patch Manager, which is the capability that allows us to automate the application of patches on EC2 instances or On-Prem servers.
It is important to remember that this capability is free and that managing our EC2 instances with AWS System Manager is free (not all abilities are free, but many are free). Managing instances on On-Prem is free for the first 1000 instances per account.
In this way, we can automate patching simply and economically.
Arquitectura de Patch Manager
A typical architecture in Patch Manager would be to update ec2 instances and On-Prem instances from Patch Manager.
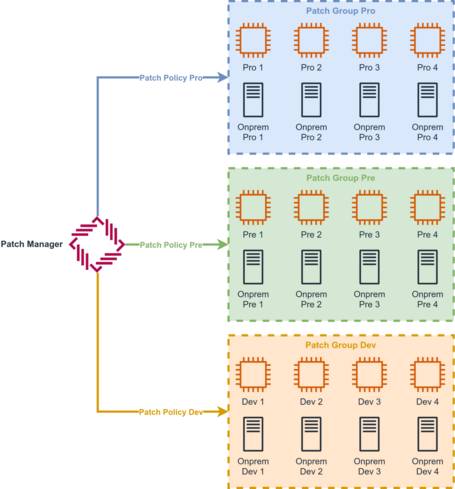
This architecture has different patch policies for different environments and with hybrid instances.
Thus, each patching policy can have different windows using different Patch Baselines, which depend on the criticality of the patches and even the type of patches (Security, Fixes, etc.).
An example of this architecture would be the following:
- Launch the patching of the development environment instances on a Monday afternoon.
- Release the PreProduction patch on Wednesday afternoon
- Launch the Production patching at dawn from Saturday to Sunday.
This way, we could have all our instances at the latest level in less than a week, when this update can take months.
The development teams would not be affected since the instances would be available the day after the application, and development teams could launch tests to validate the patches so that when they reach Production, everything is okay.
We could also launch emergency patches in case a severe vulnerability is detected. I have unfortunately had to use this use case. Still, it allowed us to fully update the environment in less than a day and quickly address a critical vulnerability.
But is it that easy to use?
The best way to see it is to analyse how we would deploy this service, and we will explore the necessary steps for it.
Preparing the environments
We first need to prepare the environments so that the AWS System Manager can manage them. For this, the instances must have the AWS System Manager agent installed.
By default, this agent is pre-installed in different AMIs provided by AWS, such as Amazon Linux, Suse, Ubuntu, Windows Server, etc. We can watch the list at the following link.
If we do not use an instance with the agent installed, it can be installed manually on Linux, Windows, and Mac instances.
However, I recommend that in EC2 instances, we always use images with the agent installed (we save installation and some additional problems).
Prerequisites for EC2 instances on AWS
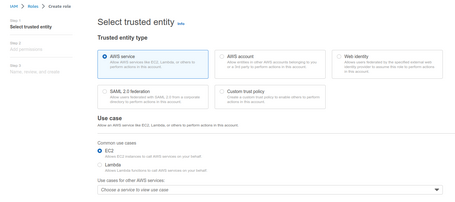
Before installing the agent, we need a role allowing our instances to use AWS System Manager.
For this, we generate a role with a Trusted Policy for EC2.
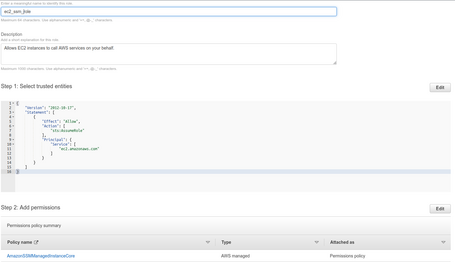
We add the policyAmazonSSMManagedInstanceCore, which is what allows you to use SSM.
This role is the one that we will use as a professional instance in our EC2 instances.
Additionally, we need our environments to either have internet connectivity via Nat Gateway or to have several VPC Endpoints configured to allow access to AWS System Manager endpoints:
- ssm
- ssmmessages
- ec2messages
- s3
We required S3 endpoint for downloading patches from S3.

Prerequisites for On-Prem instances outside of AWS
For servers outside of AWS, generating another role with a Trusted Policy to System Manager is necessary.
The difference is that in the role for EC2. We let the role be assumed from the EC2 service, but in this case, we have to let the System Manager assume the role since we cannot impersonate from the On-Prem servers, but the agent can act as a gateway.
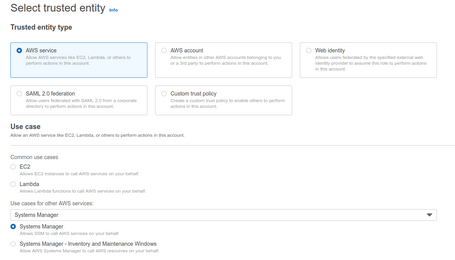
We add the policyAmazonSSMManagedInstanceCore, which is what allows you to use SSM.
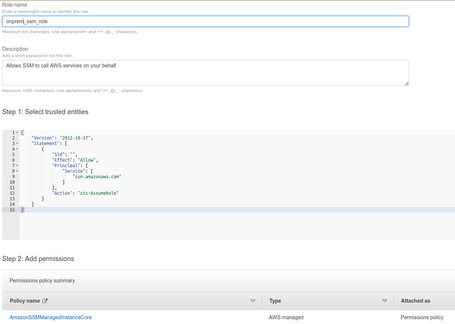
With this role, we can generate a hybrid activation key so that the System Manager can manage a group of servers using this role. We can do this from the AWS System Manager console in Hybrid Activations:
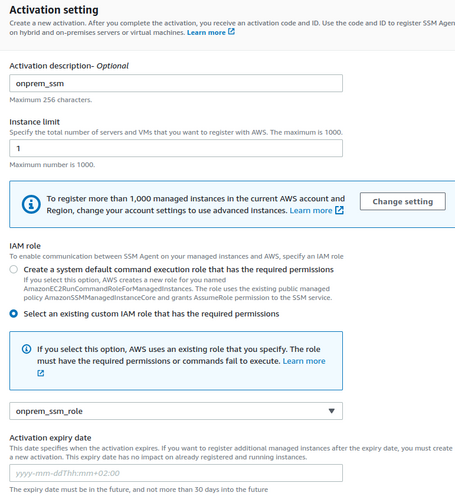
The generated ID will provide us with an activation key to add our On-Prem instances to SSM.
We must install the SSM agent inside our servers and activate the hybrid environment using the activation key. We can check the procedure in this link.
The servers must have connectivity to AWS; we can use the Internet with direct connectivity, or it is even possible to use a Proxy or, in cases where AWS Direct Connect is available, use it for interconnectivity with this service.
Once the instances are registered, they can use the role we have generated without security risk, since AWS registers them with the activation key.
Checking that the instances are correctly registered
Within Fleet Manager, we can see the instances that have the agent installed and are registered in AWS System Manager:

In this case, we see two instances:
- EC2 instance, which starts with i-xxxxxx,
- Managed instance with the Instance Id mi-xxxxxx format (This instance is a Server registered from outside AWS).
Defining a Custom Baseline Patch (optional)
A Patch Baseline is the level of patches that we want to apply by default. A series of Patch Baselines generated and managed by AWS allows us to have the latest patches. Still, in some instances, it may be interesting to deploy a Patch Baseline Custom to have more control.
It is easier to use the Default Baselines, especially when we start with this service. So unless you are very clear about the exceptions that you are going to generate, my recommendation is to start working with this service using the Default Patch Baselines and ignore this part of the setup.
Before generating the Patch Manager configuration, we must do this step to use these Custom Patch Baselines.
To do this, we access the Patch Manager console to the Patch Baselines topic and generate one.
First, we define the name and the Baseline Operating System (Each type of Operating System has its Baseline).
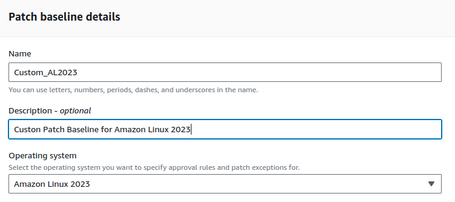
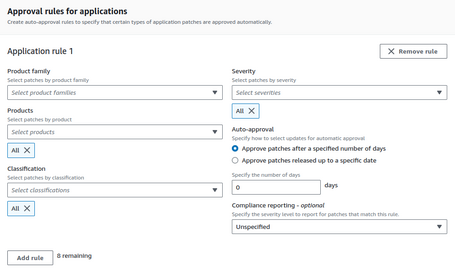
Then, we generate the rules to approve the patches:
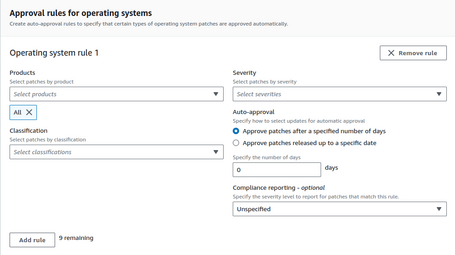
So we can choose which products we apply to (in Amazon Linux 2023, we only have one, but in other operating systems, we can have more).
We can select the severity level we want to approve for our patches and the classification. With this, we generate a BaseLine of patches that we can self-approve directly or wait a few days so that we can review the patches proposed by our base and be able to approve them or not.
In the case of Windows, we can also generate Approval Rules for different Windows applications, such as Active Directory, Exchange, Office, etc.
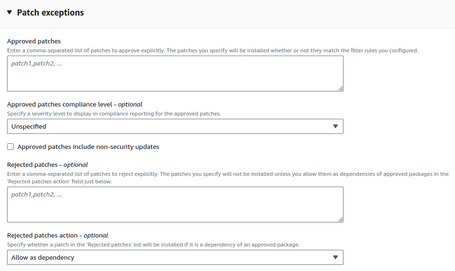
We can also manage exceptions to approve patches that do not enter our Baseline, or deny specific patches. This is interesting for legacy applications that we cannot update.
Finally, we can configure additional sources of patches to use other repositories, such as a private patch repository.

Once the Baselines we will use are defined, we can start with the Patch Manager.
Generando la configuración de Patch Manager
Patch Manager has a recent utility called Patch Policy (AWS released in early 2023, and we featured it in our January news post).
A Patch Policy is nothing more than a policy that allows us to define the patching groups, maintenance windows, etc.
In the past, this was done using Patch Groups and was a bit more complex.
The first thing would be to define the parameters of our configuration:
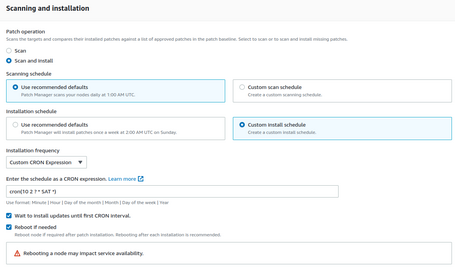
We have to specify the type of operation. In this case, we scan, install the patches, and define different periods.
In this case, we are indicating that our policy will scan patches daily at 1:00 UTC and that we will install the patches on Saturdays at 2:10 UTC. This type of expression is fully configurable.
We also tell you to reboot if necessary.
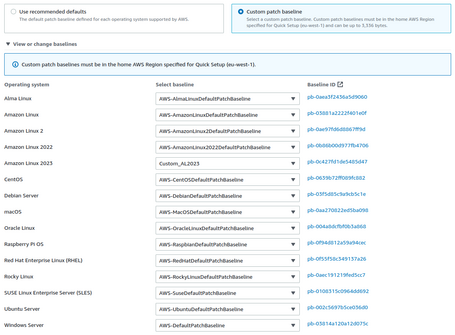
We can also define the Baseline. In this case, we use the default one:

We could use the Custom Patch Baseline that we have generated:
It is possible to store the logs in a bucket of our choice:

We will choose the target:
In an account that manages the organization, we can choose the entire organization or different OUs, which will apply to all EC2 instances.

When choosing the account itself, we can define the target more limitedly.
If we select the region where we are deploying this Patch Policy, we can choose between all the nodes, a resource Group, and a tag or select the instances manually.

If we choose regions (It is possible to select all the areas), we can only choose all the nodes or a tag.

The most optimal in our case is to use tags. In this case, we use the Patch Manager tag with the pro value to generate several Patch Policies for different environments.

Finally, we can define the limits for the patching concurrency and mark the policy as wrong if any update fails.

In case we had forgotten, it is also possible to add the policies to the instances, but I recommend doing it manually (Or preferably via IaC).
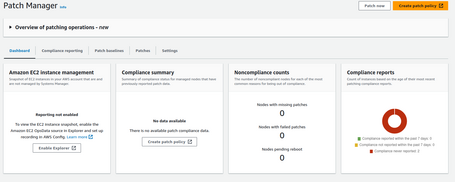
We can see the report, which will initially indicate no Compliance report because we have yet to execute it.
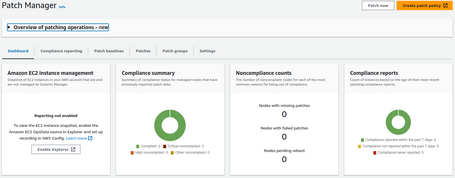
Once we execute the report and the patches applied, our report will indicate if we have our environment patched to the latest level or if we are missing patches:
Conclusions
It is pretty simple to deploy. We can deploy it using IaC, either CloudFormation or Terraform. It is possible to carry out patching policies within an organization, but if we want to apply it to only some instances, we must use it account by account. But this is not a problem since, via IaC, we can deploy Patch Manager as part of our BaseLine when deploying accounts if we use our own Landing Zone or Control Tower customizations. This implies that we can automatically add these Patch Policies to each new account. In this way, it would only be necessary for a project to use the defined tags to allow the automatic patching of its instances.
In addition, as we have seen, it is possible to use hybrid environments by registering and patching servers outside of AWS, allowing us to utilize this functionality outside of AWS.
As a last point, it is not a tool with an additional cost, which is an incredible competitive advantage.
Everything is an advantage. We will have all the instances patched automatically and at no cost.
Wait because it will not work correctly in Auto Escalation or Auto Scaling Group.
We will not be able to restart the instances after installing the patches because, in the event of a restart, Auto Scaling Group will launch a new instance with the AMI without updating.
But this is not a problem either because there is another tool to automate these cases, which we will discuss in the second part of this post...
So, see you in the next post ;)
Comments are moderated and will only be visible if they add to the discussion in a constructive way. If you disagree with a point, please, be polite.


Tell us what you think.