Actionable data are the key to
success for any online store. If you have been
running an ecommerce business, you may already be aware of how important
data-driven ecommerce marketing is.
In this post we are going to go over the benefits of setting up ecommerce tracking in Google Analytics. In addition, this process can also be applied to the earliest stages of e-stores. Let’s go!

Data tracking, the key to
ecommerce optimizationConfiguring
ecommerce tracking is a must to keep
track of any store’s performance.
While
basic – or classic – ecommerce tracking in Google Analytics shows us which
products are successful and which ones are failing, the truth is it does not provide essential information
about customers’ ‘actual journey’ or, as is most commonly known, ‘customer journey’.
Therefore,
the mystery behind why some products are more successful than others remains
unsolved.
This
is where Google’s Enhanced Ecommerce analysis comes in handy: to dive into a store’s sea of data and extract
everything that is needed to analyze
customer behaviour on the website.
Why is Enhanced Ecommerce so
important?If
we put ourselves in customers’ shoes, we will see that there are several
situations that can take place before they make a purchase. Customers can add
items to a wish list before buying them, or even visit a product’s page 10
times to review its details in length.
Their
actions could be driven by diverse trends, such as comparing the prices of
products on competing websites, waiting for a discounted price to be offered,
waiting for a product to be back in stock, and so on.
Marketers and business developers need to obtain information about customer journeys to decide which area of the business needs optimizing.
Enhanced Ecommerce allows us to obtain actionable data by tracking the entire customer journey.
What does Enhanced
Ecommerce tracking do for us?Traditional
ecommerce analytics was based on a goal that had to be invariably met (in most
cases, a purchase) to generate data such as:
- A product’s conversion rate.
- The total value a product’s sales
came up to. - The quantity sold.
- The total impressions.
With
Enhanced Ecommerce there is no reason for us to restrict ourselves in terms of
tracking ecommerce. It allows us to
track the smallest details in order to help us to optimize
our store.
This
includes:
- The behaviour of customers.
- Our commitment to customers.
- Product performance reports.
- Shopping cart abandonment rates
and causes. - Performance coupon and discount.
- Detailed affiliate reports.
- Reimbursement reports.
- Content marketing reports.
Enhanced Ecommerce not only allows us to monitor product performance and analyze the sales funnel, it also aims to provide us with much deeper insight into customer behaviour in order for us to be able to optimize this funnel, thus enabling us to improve user experience and our marketing plans.
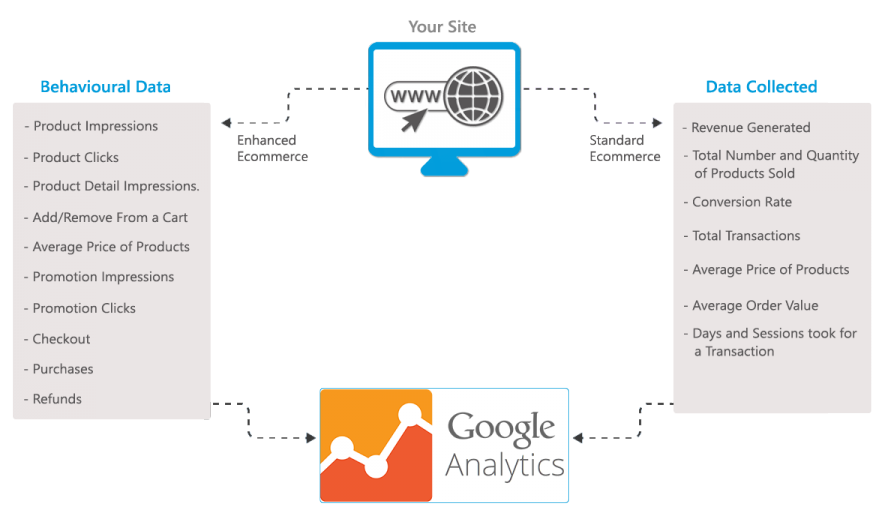
What data is collected?
To
help developers and analysts determine what kind of data they want to track,
Google has grouped data into four
categories:
- Impression data: complete
information about a product that has been viewed by a customer. - Product data: information about
the individual products that are displayed. - Promotional data: information about
the promotional items/banners that customers have clicked on on a website. - Action data: information on all
ecommerce actions that take place on a website.
Please refer to the Google Analytics tracking guide for a detailed list of all the individual data types that can be tracked in each of these categories.
Now
that we know what we can track with Google Analytics, the next step is to
implement Enhanced Ecommerce Analytics
and use it to send the analysis data
from our store to Google Analytics.
From
here on, the process may start to seem a bit ‘tedious’, especially when running
the analysis of a store with a huge database of products and categories.
Implementing Enhanced Ecommerce
Nowadays
there are countless stores that still consider enhanced ecommerce a secondary
option. Thus, they lose a lot of valuable data that could very well take their
marketing strategy to the next level.
Most
likely, the reason is that the configuration process is a tad complicated and,
yes, that in addition it requires basic knowledge of JavaScript or jQuery.
Requirements
Enhanced Ecommerce Analytics can only be activated using Universal Analytics or Google Tag Manager (GTM).
NOTE: The new version of Universal Analytics still exists, but now manual implementation is done with another plug-in – global tag or gtag.js – that is similar to Google Tag Manager’s but directly via code. Click here to learn more about Analytics’ Global tag.
Even though most online stores have already moved to Universal Analytics (if not to Google Tag Manager), some are still using classic analytics. If you own one of them, it is time for you to upgrade and discover what you have been missing out on.
Activating EEC
(Enhanced Ecommerce) for Universal AnalyticsIf
we are using Universal Analytics, we will have to manually trigger EC.js – the
enhanced ecommerce plug-in.
The
code that triggers the plug-in is specified right after our Google Analytics UA
code, followed by plug-in commands to track the data and send it to Google
Analytics.
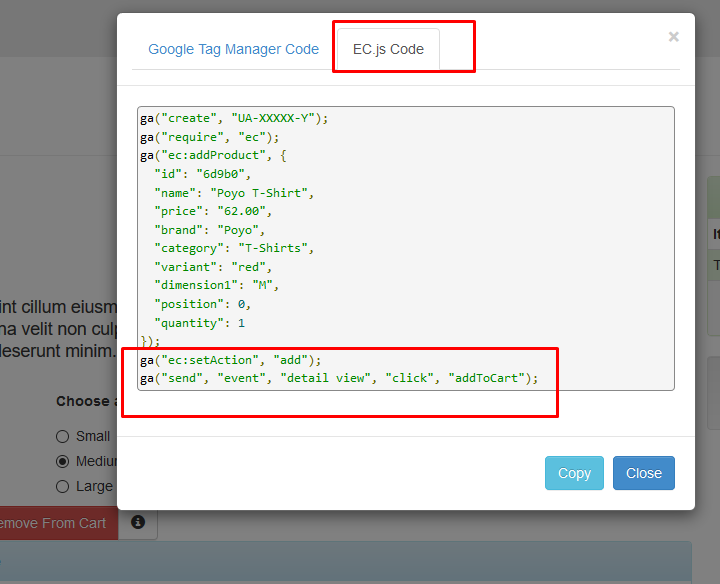
During the implementation phase,
the code would look like this:
STEP 1. The first step is defining the property; since we already have the main script, this part has already been defined:
ga('create', 'UA-XXXXX-Y', 'auto');
STEP 2. Define the ecommerce.js plug-in:
ga('require', 'ec');
STEP 3. Now we can continue with the other measurements (examples):
- Impression measurement
ga('ec:addImpression', {
...
});
- Clicks on products
ga('ec:addProduct', {
...
});
// seguido por la acción
ga('ec:setAction', 'click', {       // click action.
'list': 'Search Results'          // Product list (string).
});
STEP 4. The actions will be successively sent with the send command:
ga("send", ...);
This example shows how to send events with Category ‘homepage’ and Action ‘click’.
ga("send", "event", "homepage", "click", "");
Click on the link to learn more about the structure of Google Analytics events.
The codes need to be implemented exactly in the same order; otherwise, tracking will fail.
Activating EEC (Enhanced Ecommerce) for Google Tag
ManagerIf we have set up analytics with Google Tag Manager then the process to configure enhanced ecommerce is somewhat more complicated and a few more steps need to be added.
% block:caption
% image:https://www.paradigmadigital.com/wp-content/uploads/2019/03/enhanced-ecommerce-google-3.jpg
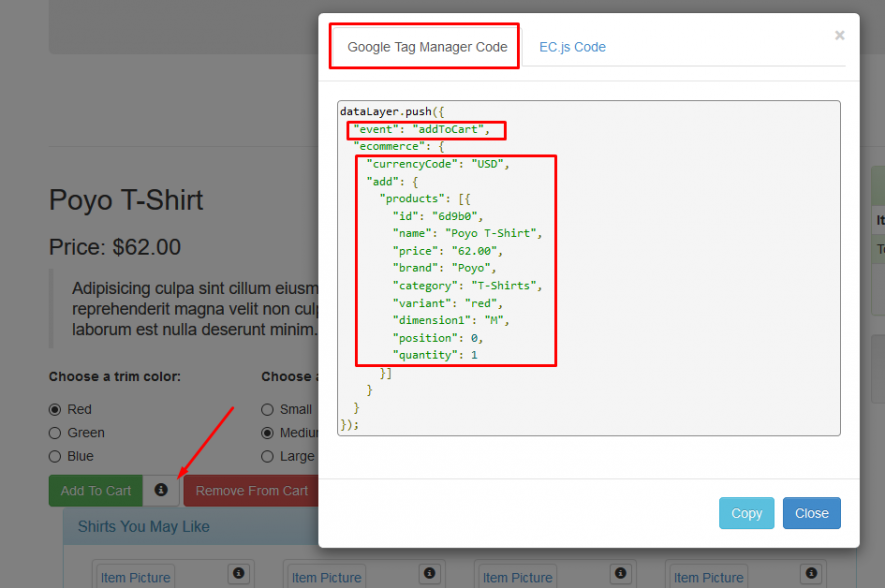
% caption:The code will be implemented through dataLayer, like globalTag.js, but it is much easier to manage in the interface.
% endblock
The
basic idea for using GTM for enhanced ecommerce tracking is to set up multiple
layers of data (dataLayers) in our website in
which to temporarily store the data displayed on each store page.
These data layers are encoded in various page elements throughout the store, such as: clicking on products, adding products to the cart, adding products to the wish list, and so on.
This
data is later retrieved by the variables that have been predefined in our GTM
account by using tags that are activated according to the triggers we have
defined in our Google Tag Manager account.
From
these variables, the tracking data is
sent cumulatively to Google Analytics, where it is converted into actionable
metrics.
The GTM Developer Guide summarizes the specific data layers that a website’s different pages require, something that everybody should do to configure the relevant data layers.
NOTE: It is important to bear in mind that some Tag Manager variables, as well as some Analytics variables, are already assigned, so we should not change their nomenclature.
Once we have coded the relevant layers for our ecommerce store and configured the relevant triggers and tags for retrieving data from those data layers, we have to enable enhanced reporting in our GA or Tag Manager account and configure the relevant verification tags to track the data.
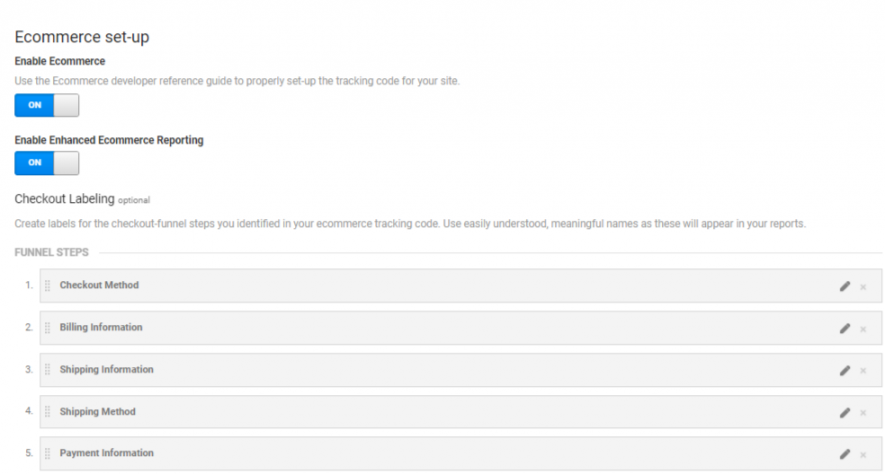
We
must make sure to add meaningful payment tags, as they will eventually be used
to calculate the payment success rate.
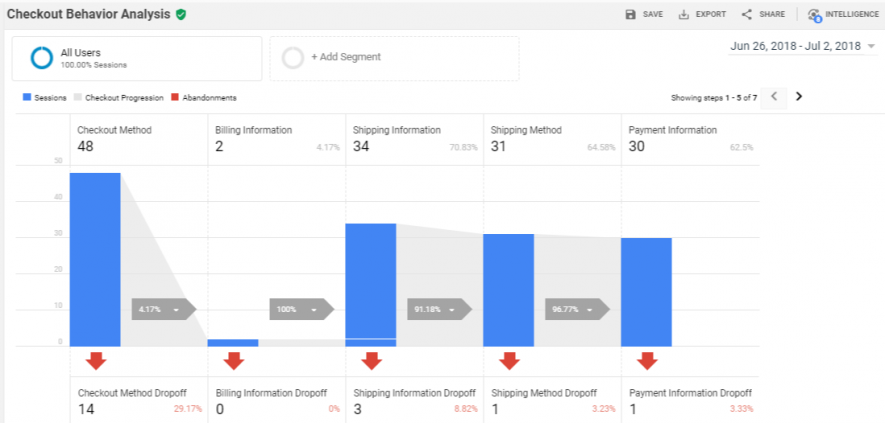
With
these tags we can track our customers’ behaviour along the different steps of a
payment process.
This data is collected and displayed by ticking the Checkout Behaviour option, as shown below:
If
we follow Universal Analytics’ or Google Tag Manager’s approach to enabling
enhanced ecommerce tracking, we will end up coding the tracking snippets (for
either GA or GTM).
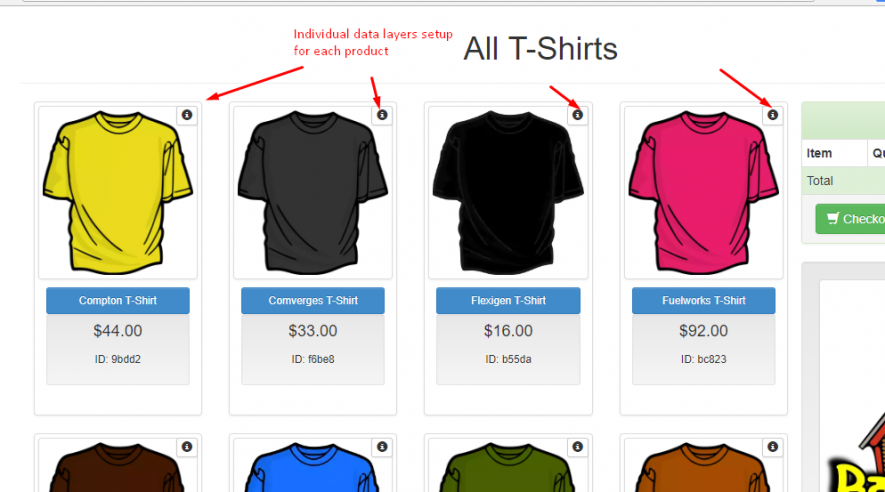
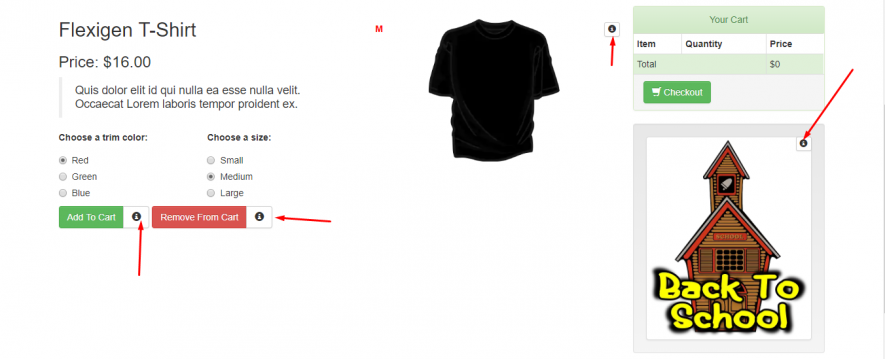
Once again, we would like to shine a light on Google’s demo warehouse to highlight how the different areas require that data layers be configured to receive information from the ecommerce store in GA.
List of products or categories
Product detail page
Managing an online store
While
the above demo store only has a small amount of data that is easy to
understand, dealing with a complex ecommerce store increases the difficulty manyfold.
Since the entire process involves implementing the correct tracking fragment or the data layer across the entire store, setting it up flawlessly can be very hard. There are two ways to do this:
1. **Using a third-party add-on for
your ecommerce CMS**The main CMS
systems already have add-ons in their respective markets that can do the job
automatically. By simply installing the add-on
and integrating it with your Google Analytics account, you can enable or
disable those impressions, actions or items you want to track.
Some reliable
add-ons with which we have worked in the recent past include:
- Magento: Google Analytics Enhanced Ecommerce
- Shopify: Analytics Buddy
- WooCommerce: Enhanced Ecommerce Google Analytics Plugin
2 Manually implementing the data layers
Although
all main platforms provide support for add-ons, we may run into a scenario
where our CMS does not have an add-on (eg BigCommerce or OpenCart) yet or where
a custom ecommerce store has been created using a framework such as CodeIgniter
or YII.
In such cases, we recommend hiring professional developers to deploy the code snippets or data layers at precise locations in the store.
The time has come
to test things with Google Tag ManagerIt is essential to test your implementation before and after you implement it on the live website given that there could always be an underlying error in the improved ecommerce implementation.
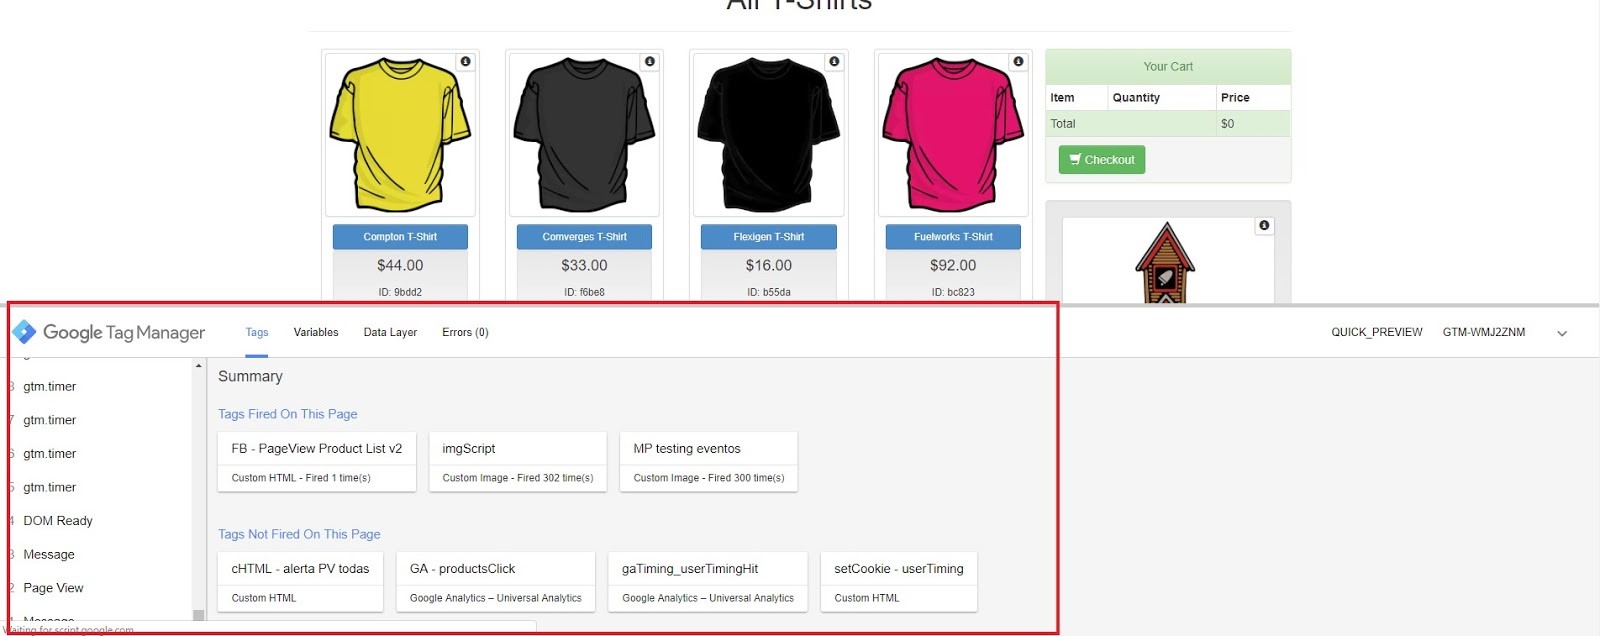
Testing in Preview mode in Tag Manager:
Google
Tag Manager features a preview and debug mode that allows you to keep a console
editor at the top of the website where you want to publish your GTM container.
This console can only be seen in the browser where you have enabled the Preview mode.
In
the Preview and Debug mode you can access all four elements of a GTM account:- Event timeline: It lists all page load events that have taken place until the page of the item is finally displayed in the browser.
- Tags: It lists all tags that have been added to the page, that have been triggered and that have failed.
- Variables: It shows detailed information about the different variables that collect data in the selected event in question, including the type of variable, the type of data returned and the resolved value.
- Data layer: It gives a preview of the exact data layer together with all the data that was generated for the specific event in question.
- Errors: It will eventually display all global or local errors of both the JS code and our add-on.
Testing enhanced ecommerce tracking after publishing:
In
addition, monitoring the tests after publishing the Google Tag set-up is as
important as testing the set-up before activating it.
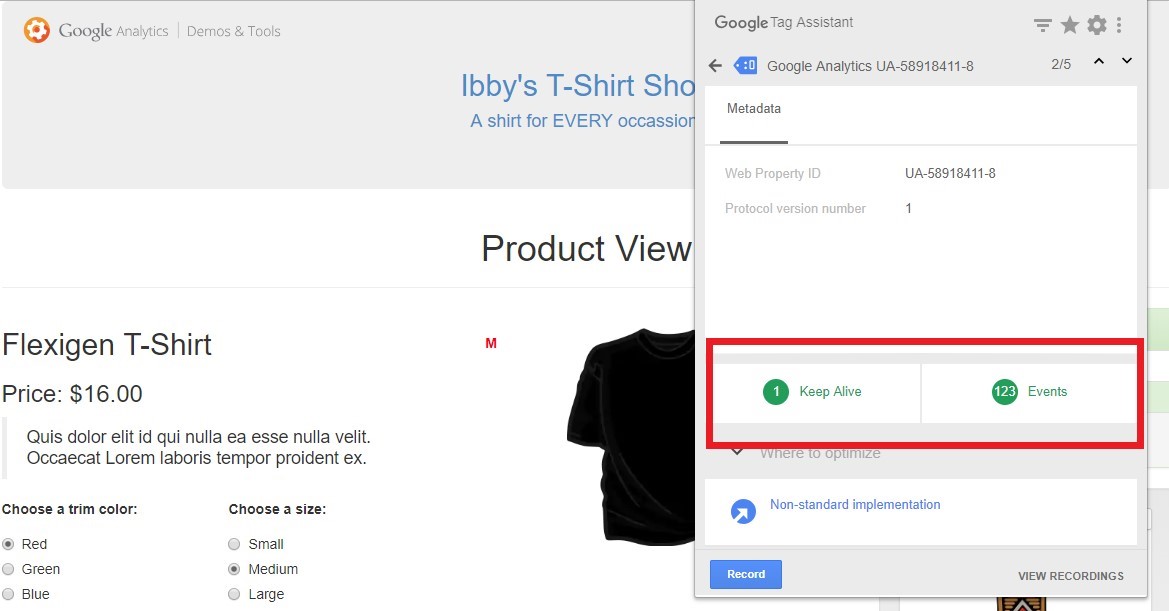
The best way to test your Google Tag Manager set-up and see whether it is still effectively sending data to Google Analytics is to install the Google Tag Assistant Chrome extension.
This extension allows you to save your session on the website and generates a full report on all the events that were triggered in Google Analytics.
Once
our test cases yield positive results, we are ready to publish our GTM
container. Now, all we need to do is remove
the traditional ecommerce tracking code from the checkout page and publish our
tag settings.
Conclusion
Before
doing anything that we have explained above, we recommend using an add-on – if
your CMS supports it. Implementing Google
Enhanced Ecommerce in a store that has many categories and products will
definitely give even the most experienced developers a few headaches.
It
is quite a challenge. However, it is
worth all the effort because the results will bring to the surface some key
ideas that will help you make business decisions more effectively.
Do
you have any questions about implementing enhanced ecommerce analytics or have
you already done so in your business? I look forward to
reading your comments!
Comments are moderated and will only be visible if they add to the discussion in a constructive way. If you disagree with a point, please, be polite.


Tell us what you think.